
Install Slick in your own cluster
Slick Private Edition runs entirely inside your Kubernetes cluster, in your cloud or on premises. This guide covers the three ways to install it, what each screen asks for, and what to do after the first install.
- Release
- 2026.10.4
- Signed by
slick-rel-2026a- Kubernetes
- 1.28 or later
- Slick itself
- about 2 CPU and 6 GiB, plus your model
Choose how to install
All three end in the same place: a Helm release named slick in your cluster, which you upgrade the same way afterwards. They differ in how much of the work they do for you.
kubectl signed in to the cluster. No Node.js.From kubectlB · Setup wizardImport the images yourself, apply setup.yaml, then finish in the same setup wizard from a browser.You need: kubectl and Node.js 20+.Full controlC · Helm by handWrite the Secret and values file yourself and run helm install. Fits GitOps and change-managed environments.You need: kubectl, helm 3.12+ and Node.js 20+.Before you start
Slick uses services you already run. Have these ready, reachable from the cluster, whichever option you choose.
| Area | You provide |
|---|---|
| Kubernetes | 1.28 or later: EKS, AKS, GKE, OpenShift, RKE2 or upstream. Its network plugin must enforce NetworkPolicy, because that is how Slick is kept off the internet. |
| Container registry | Your own, reachable from the cluster: ECR, ACR, Artifact Registry, Harbor, Artifactory. |
| PostgreSQL 16 | Managed or in the cluster. Slick uses four databases (app, cost, execution tracing, audit) and can create them if its user may. |
| MongoDB | MongoDB 7, or a compatible service. |
| Redis or Valkey | With a password. |
| Object storage | S3, any S3-compatible store, or Azure Blob. |
| Temporal Server | From Temporal's official Helm chart. It may use the same PostgreSQL server. |
| Model | Your own model server (vLLM, Ollama, LM Studio, TGI, llama.cpp or any OpenAI-compatible server), or a provider account: Amazon Bedrock, Azure OpenAI, Claude in Microsoft Foundry, Google Vertex AI, Anthropic, OpenAI or Gemini. |
| Ingress and TLS | An ingress controller, two hostnames (the API and web chat, and the admin portal) and their certificates. |
| Optional | An email relay for invitations, your SSO identity broker, and workload identity (IRSA, Azure Workload Identity, GKE Workload Identity) instead of static storage keys. |
By cloud
Sign in first, so kubectl reaches the cluster and you can push to the registry.
AWS
| Prerequisite | Use |
|---|---|
| Kubernetes | EKS, with NetworkPolicy enforcement on (the VPC CNI's network policy option, or Calico) |
| Registry | ECR: <account>.dkr.ecr.<region>.amazonaws.com/slick |
| Databases | RDS or Aurora PostgreSQL; MongoDB Atlas over PrivateLink, or MongoDB in the cluster; ElastiCache |
| Object storage | S3, ideally with IRSA instead of keys |
| Storage class | gp3 with the EBS CSI driver, marked default |
aws eks update-kubeconfig --name <cluster> --region <region>
export REGISTRY_USERNAME=AWS REGISTRY_PASSWORD=$(aws ecr get-login-password --region <region>)
Azure
| Prerequisite | Use |
|---|---|
| Kubernetes | AKS with a network policy engine (--network-policy azure or calico) |
| Registry | ACR, attached to the cluster (az aks update --attach-acr) |
| Databases | Azure Database for PostgreSQL Flexible Server; MongoDB Atlas or Cosmos DB for MongoDB (vCore); Azure Cache for Redis |
| Object storage | Azure Blob Storage, or Azure Workload Identity |
| Storage class | managed-csi |
az aks get-credentials --resource-group <group> --name <cluster>
export REGISTRY_USERNAME=00000000-0000-0000-0000-000000000000
export REGISTRY_PASSWORD=$(az acr login -n <registry> --expose-token -o tsv --query accessToken)
Google Cloud
| Prerequisite | Use |
|---|---|
| Kubernetes | GKE with Dataplane V2 (it enforces NetworkPolicy) |
| Registry | Artifact Registry: <region>-docker.pkg.dev/<project>/slick |
| Databases | Cloud SQL for PostgreSQL (private IP); MongoDB Atlas over Private Service Connect, or in the cluster; Memorystore |
| Object storage | Cloud Storage through its S3 interoperability (HMAC keys) |
| Storage class | standard-rwo |
gcloud container clusters get-credentials <cluster> --region <region>
export REGISTRY_USERNAME=oauth2accesstoken REGISTRY_PASSWORD=$(gcloud auth print-access-token)
On premises
| Prerequisite | Use |
|---|---|
| Kubernetes | Any conformant cluster 1.28+ (OpenShift, RKE2, Rancher, Tanzu, upstream) with Calico or Cilium |
| Registry | Harbor, Artifactory, Nexus or registry:2 |
| Databases | PostgreSQL 16, MongoDB 7, Redis or Valkey: your own, or in the cluster |
| Object storage | MinIO, Ceph RGW, or any S3-compatible store |
| Storage class | Any default storage class (Longhorn, Rook-Ceph, vSphere CSI) |
export REGISTRY_USERNAME=<robot account> REGISTRY_PASSWORD=<token>Qualified so far: AKS and EKS. The others use the same standard interfaces; ask Slick for the current list.
Get the release
Slick sends you two things, through two different routes.
- A download link, by email from your Slick contact. It opens your download page: the installer for each platform, and the release itself (one
.tarfile of about 1.2 GB). - The root key fingerprint, by phone or in your contract, never with the link. Every check of the release goes back to it. It starts with
sha256:.
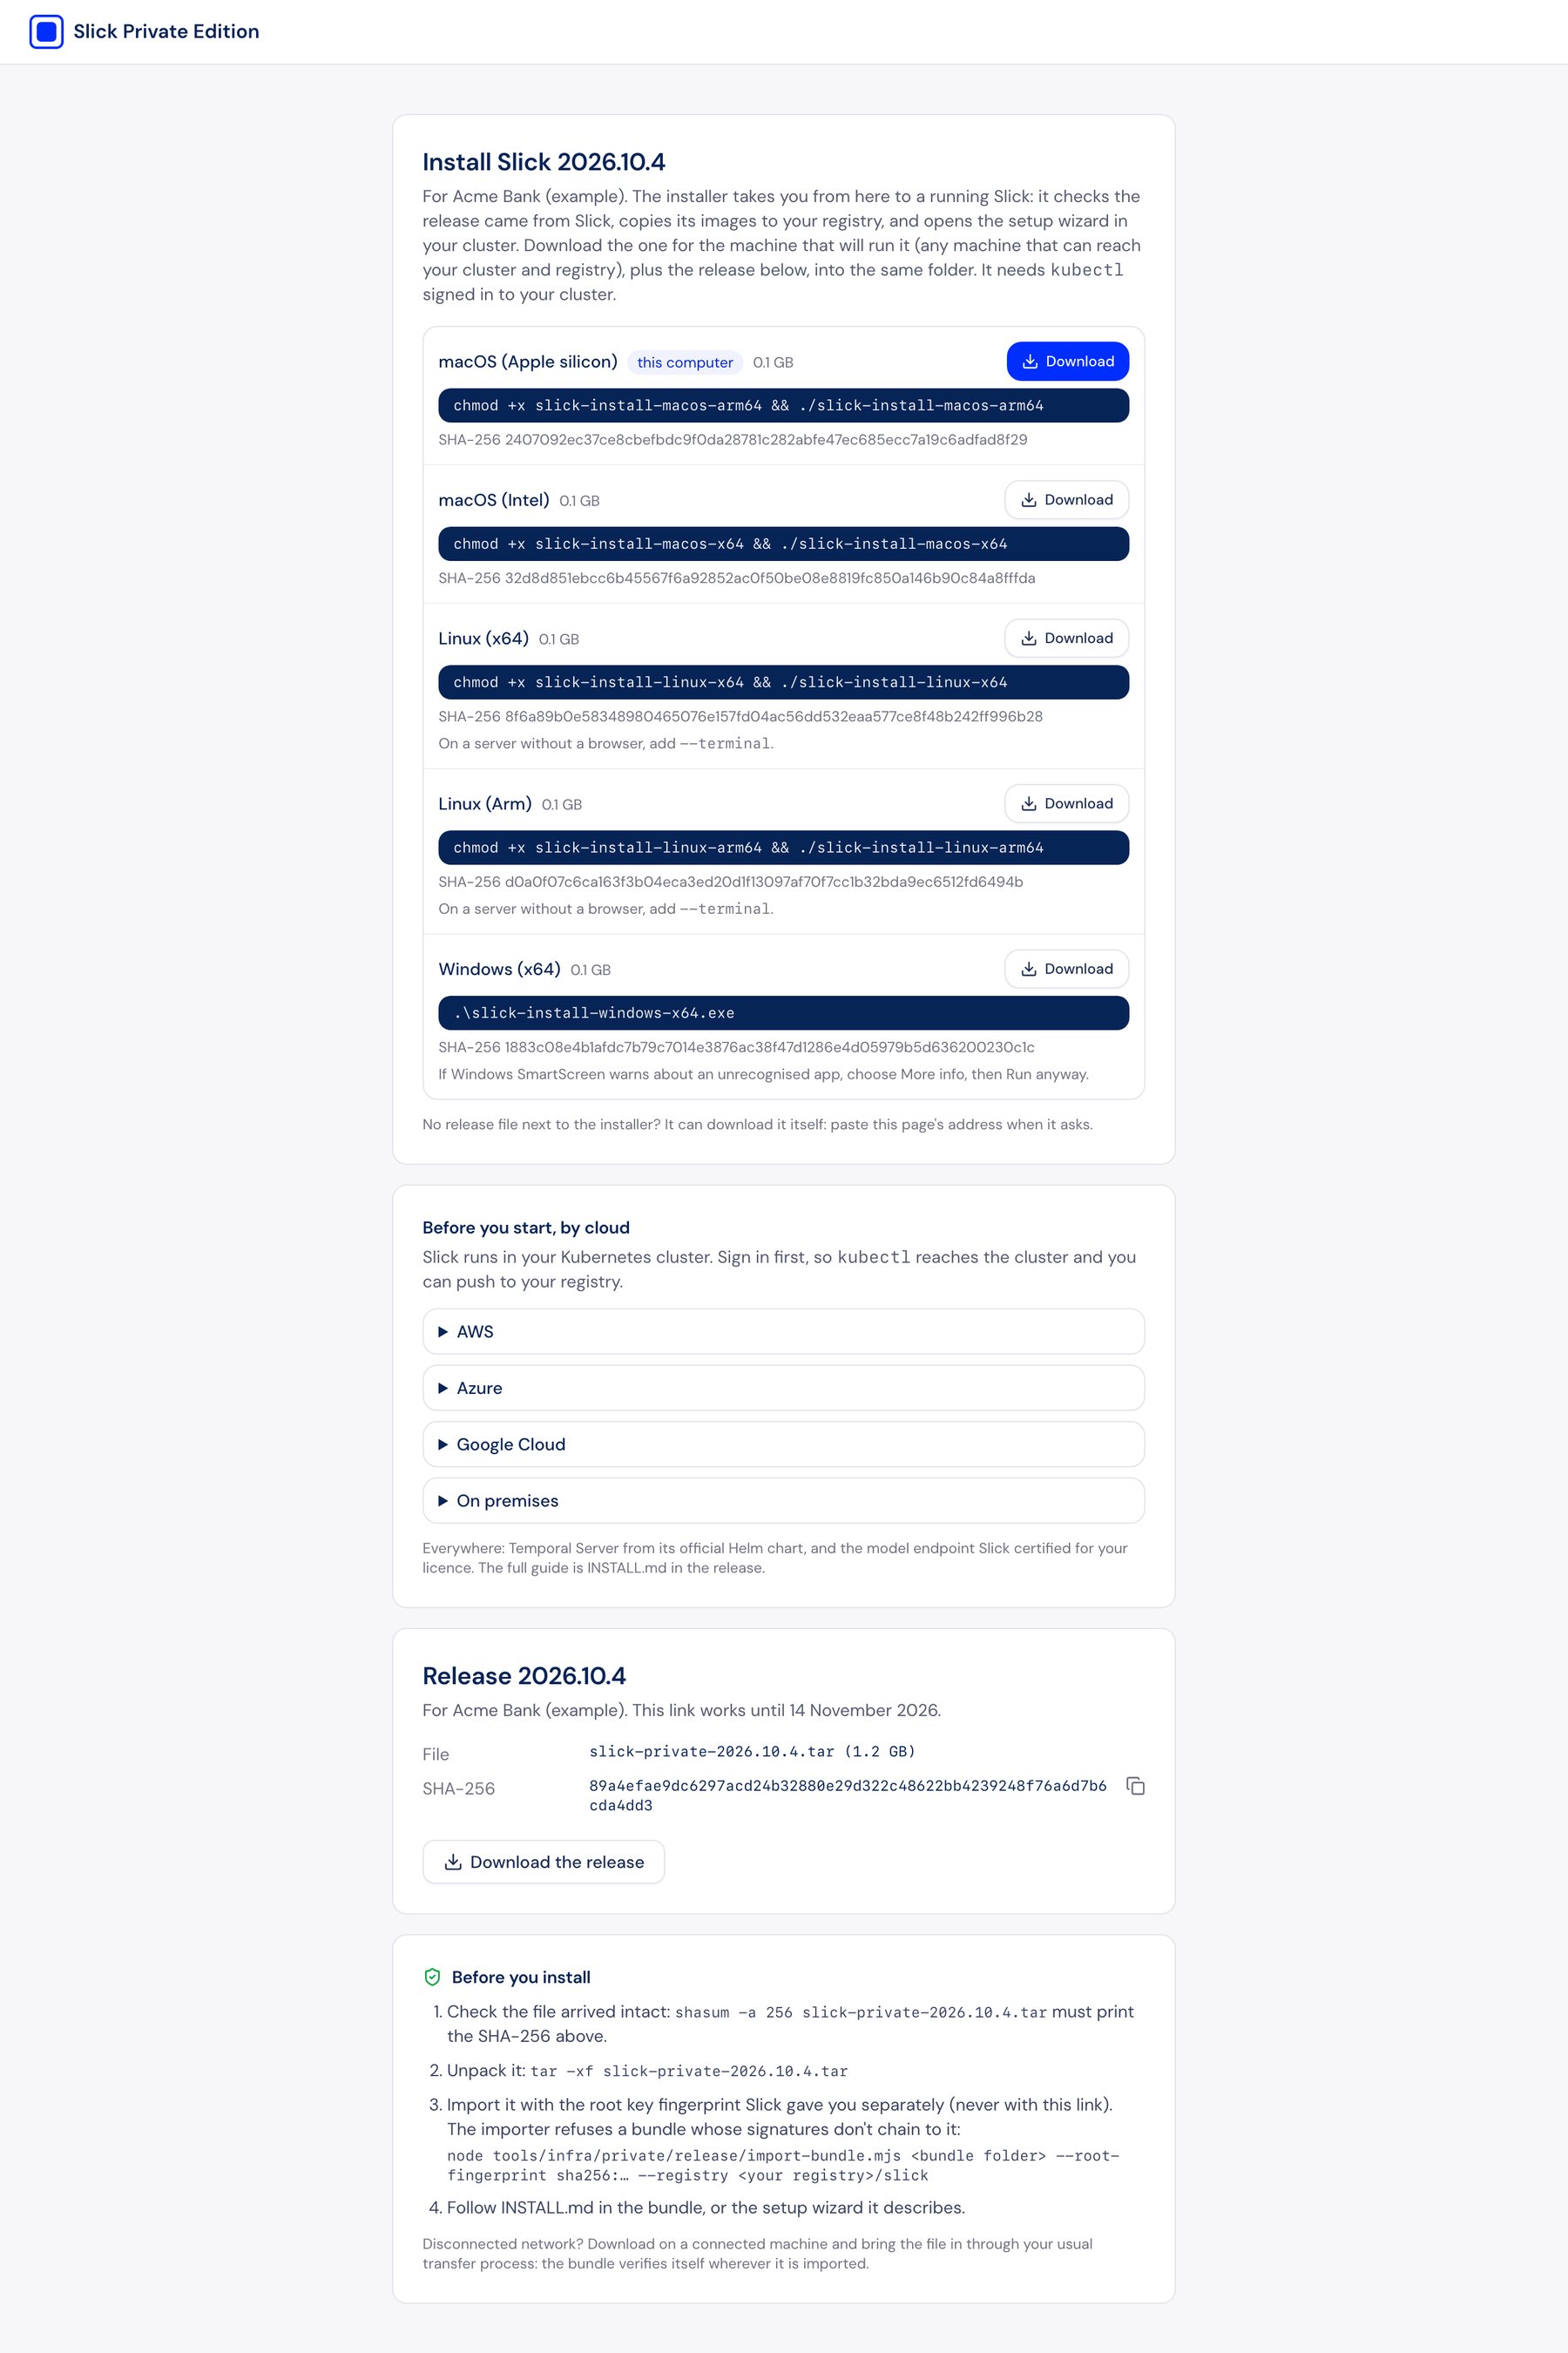
Check the release file before using it. The command must print the SHA-256 shown on the page:
shasum -a 256 slick-private-2026.10.4.tarRecommended
A · The installer
The installer does the import and the cluster preparation for you, then hands over to the setup wizard. It needs only kubectl signed in to your cluster. Run it on any machine that can reach the cluster and your registry.
| Platform | Run |
|---|---|
| macOS | chmod +x slick-install-macos-arm64 && ./slick-install-macos-arm64 (or -x64 on Intel). Signed and notarised by Slick AI Technologies. |
| Linux | chmod +x slick-install-linux-x64 && ./slick-install-linux-x64 (or -arm64). On a server with no browser, add --terminal. |
| Windows | .\slick-install-windows-x64.exe in PowerShell. Signed by Slick AI Technologies, Inc. If SmartScreen warns about an unrecognised app, choose More info, then Run anyway. |
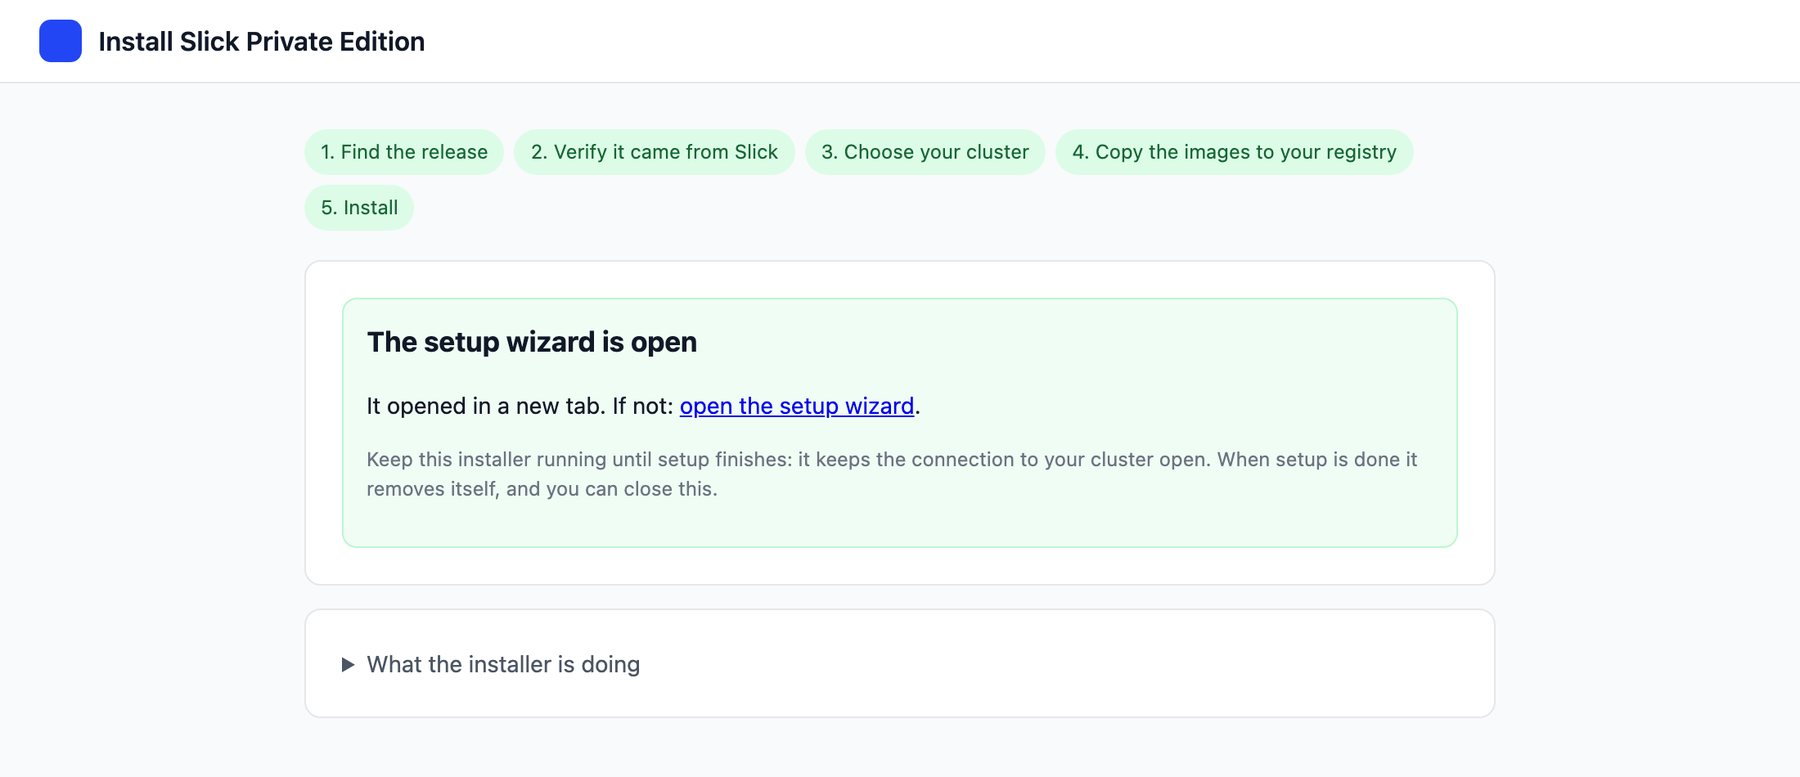
It opens in your browser. Keep the terminal window open until setup finishes: the installer holds the connection to your cluster.
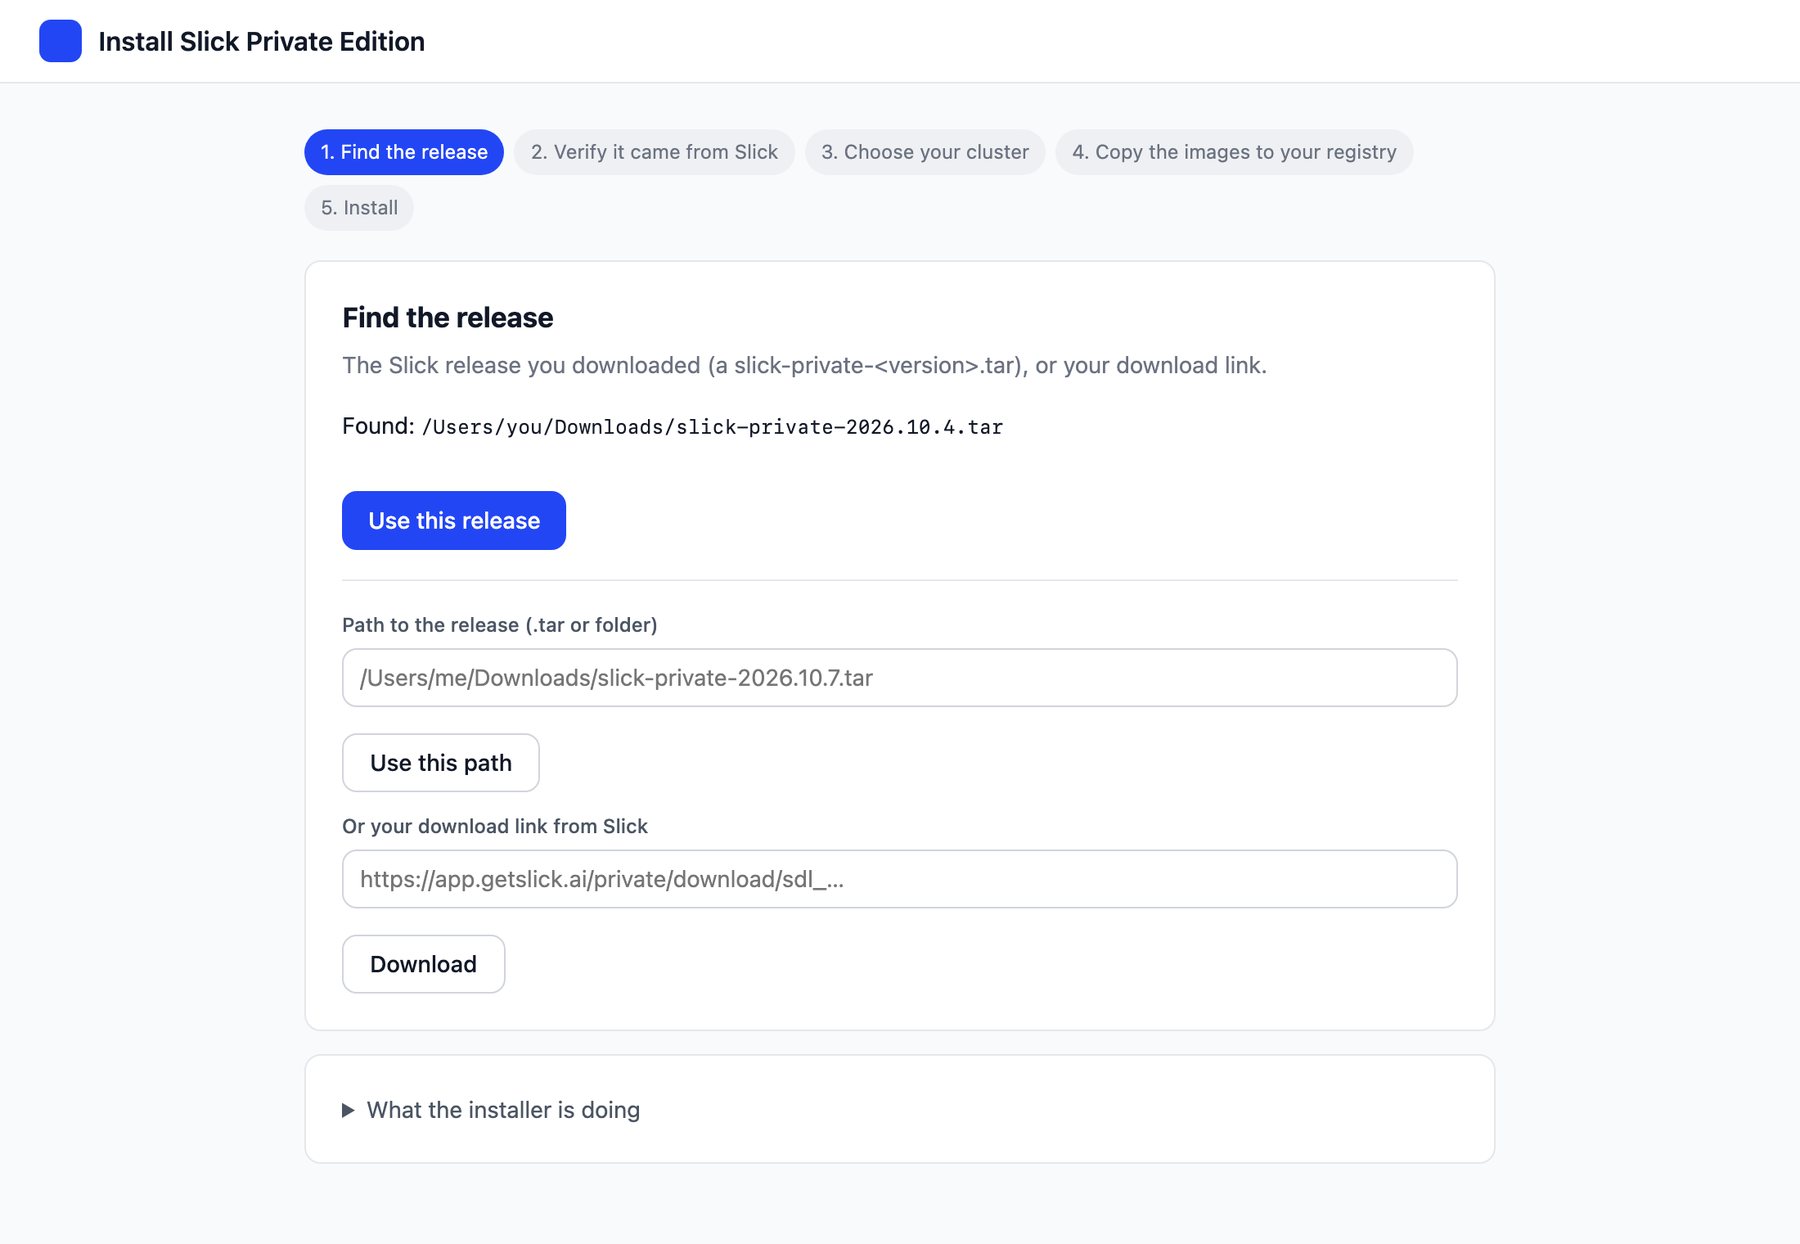
1. Find the release
If the release file is in the same folder, the installer finds it. Otherwise give it the path, or paste your download link and it downloads the release itself.
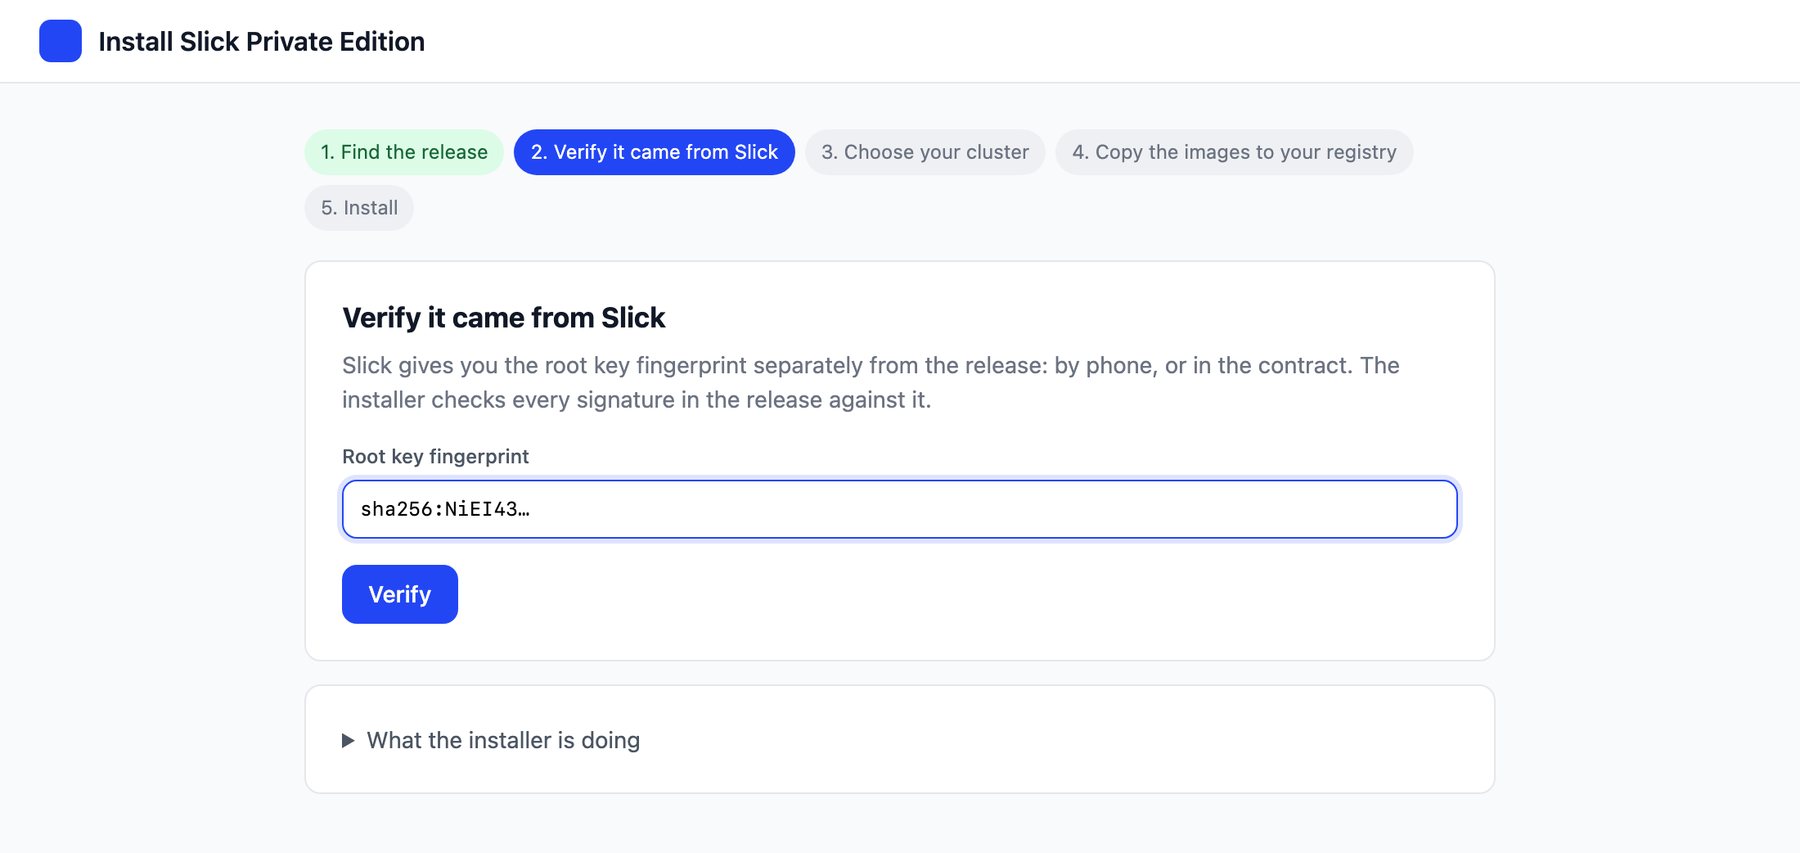
2. Verify it came from Slick
Type the root key fingerprint Slick gave you. The installer checks every signature in the release against it, and the chart and every image layer against what Slick signed. It refuses a release that doesn't match.
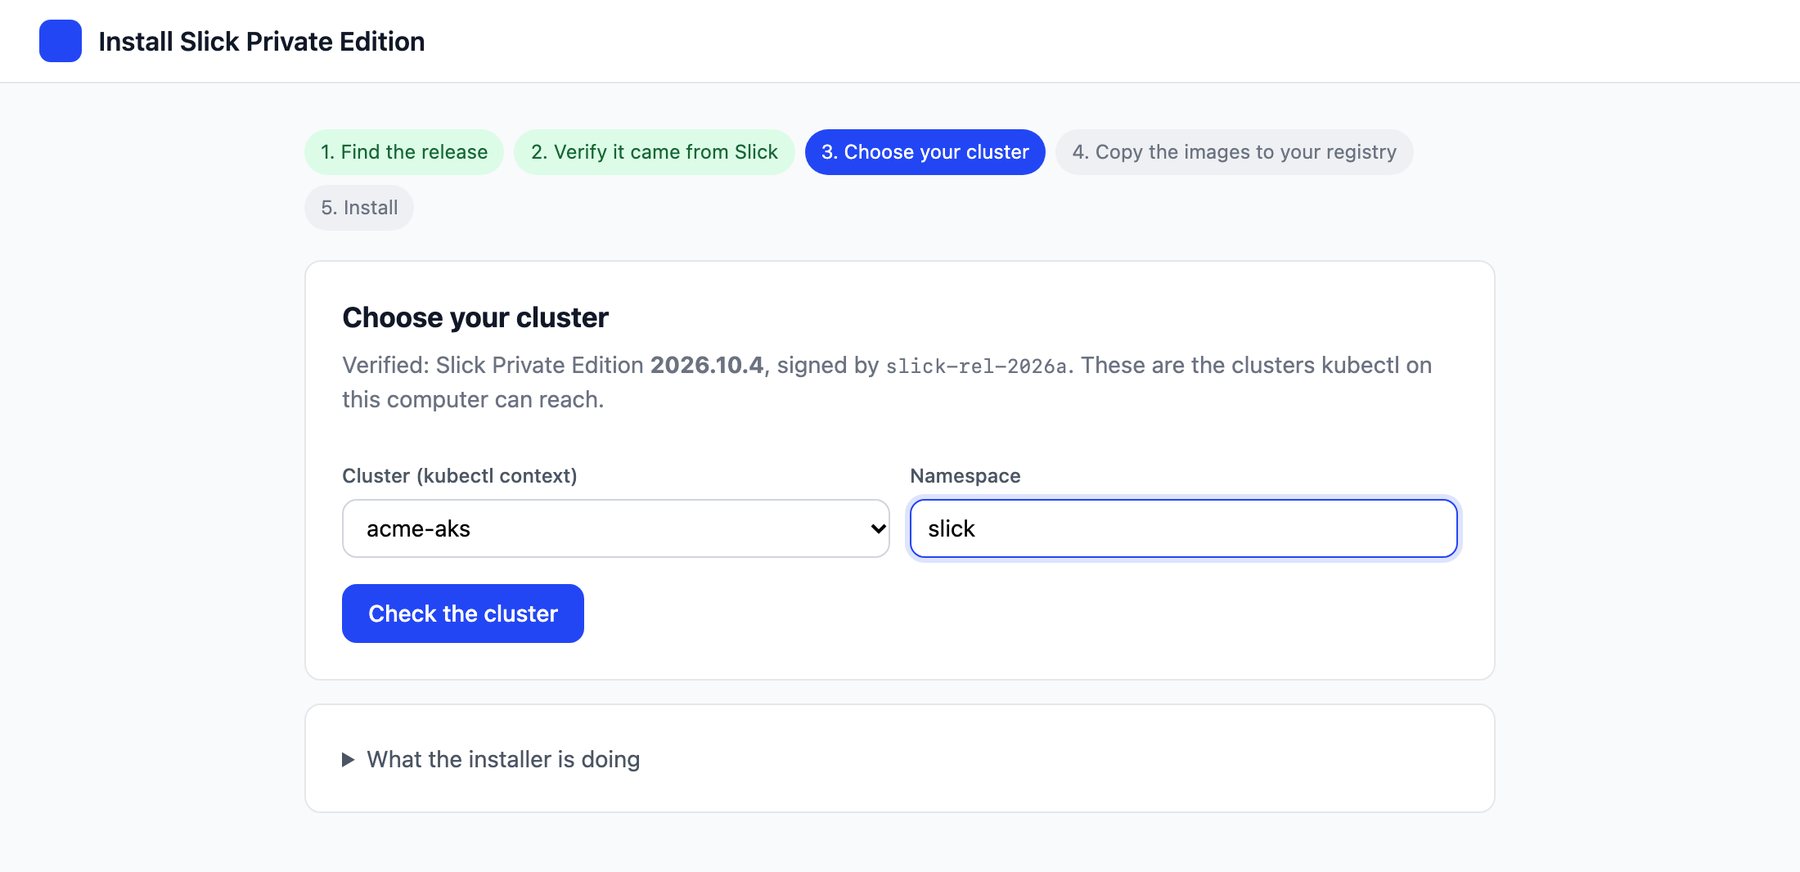
3. Choose your cluster
The list shows the clusters kubectl on this computer can reach. Pick one and the namespace for Slick (slick by default). Check the cluster confirms the version, NetworkPolicy, storage and your permissions before anything is created.
acme-aks.4. Copy the images to your registry
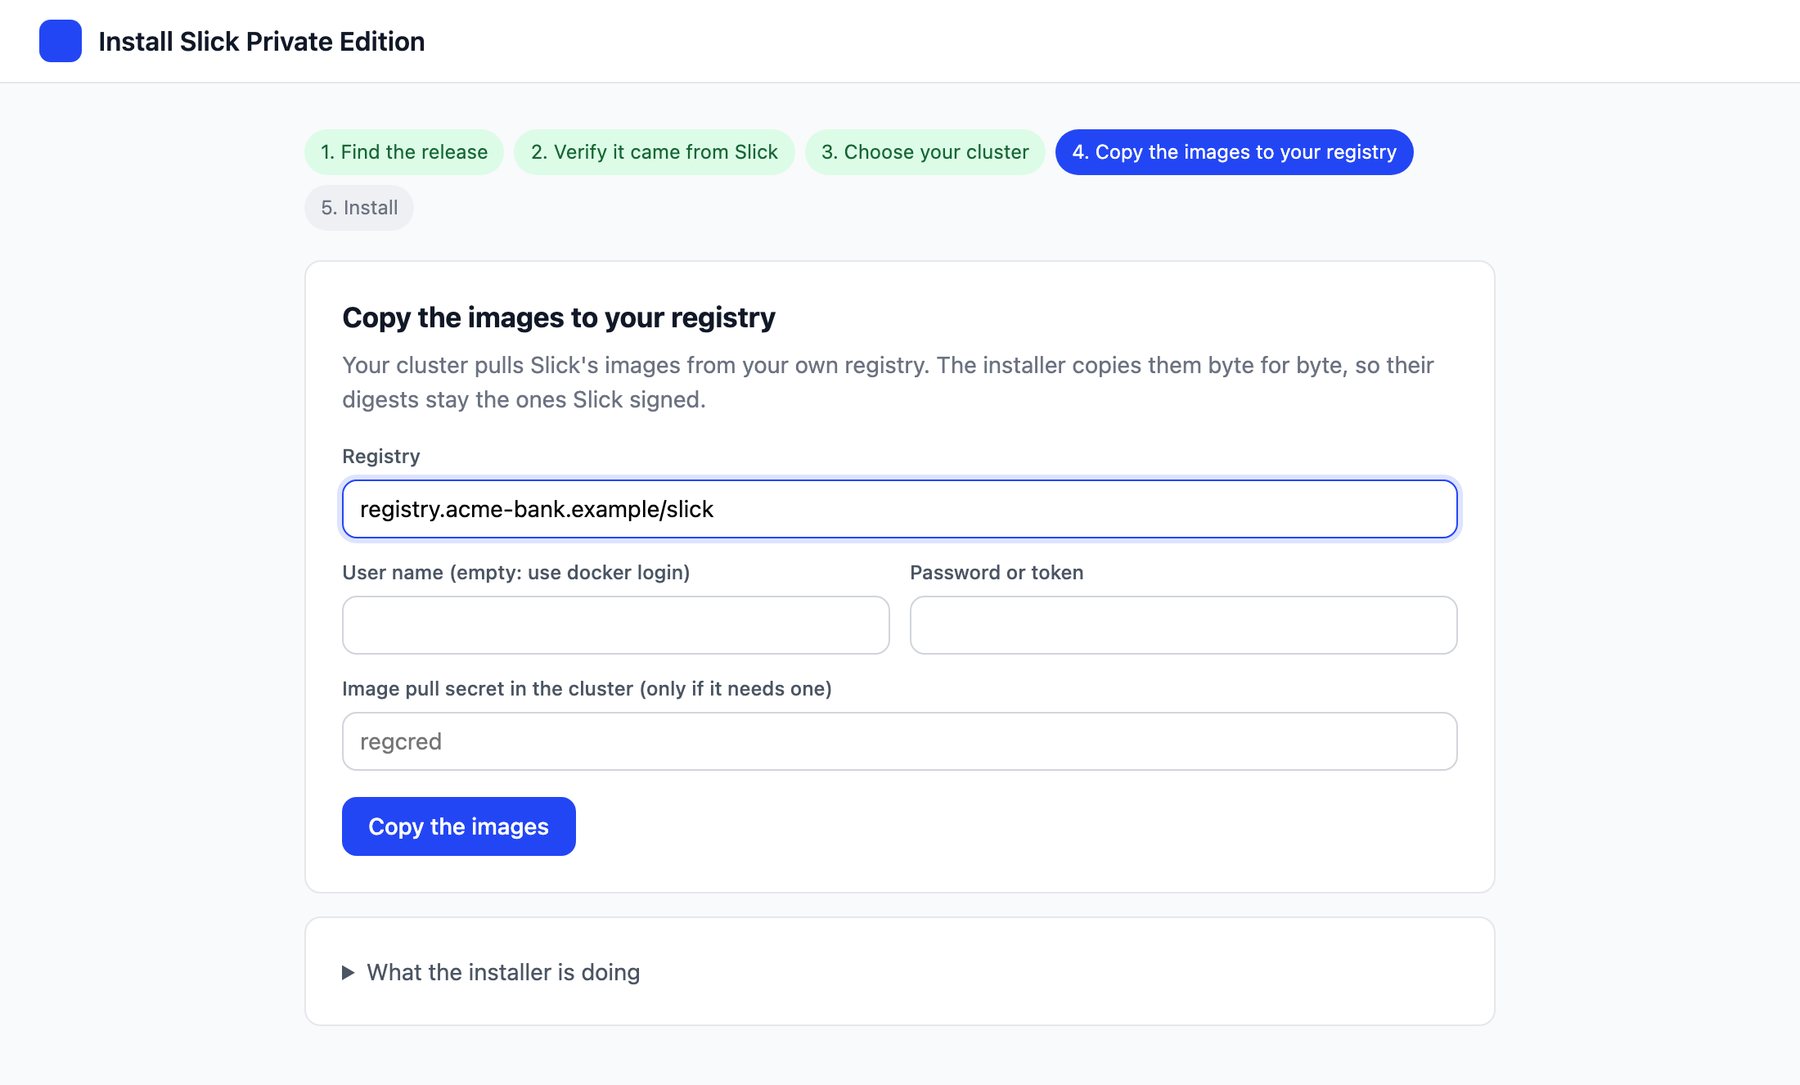
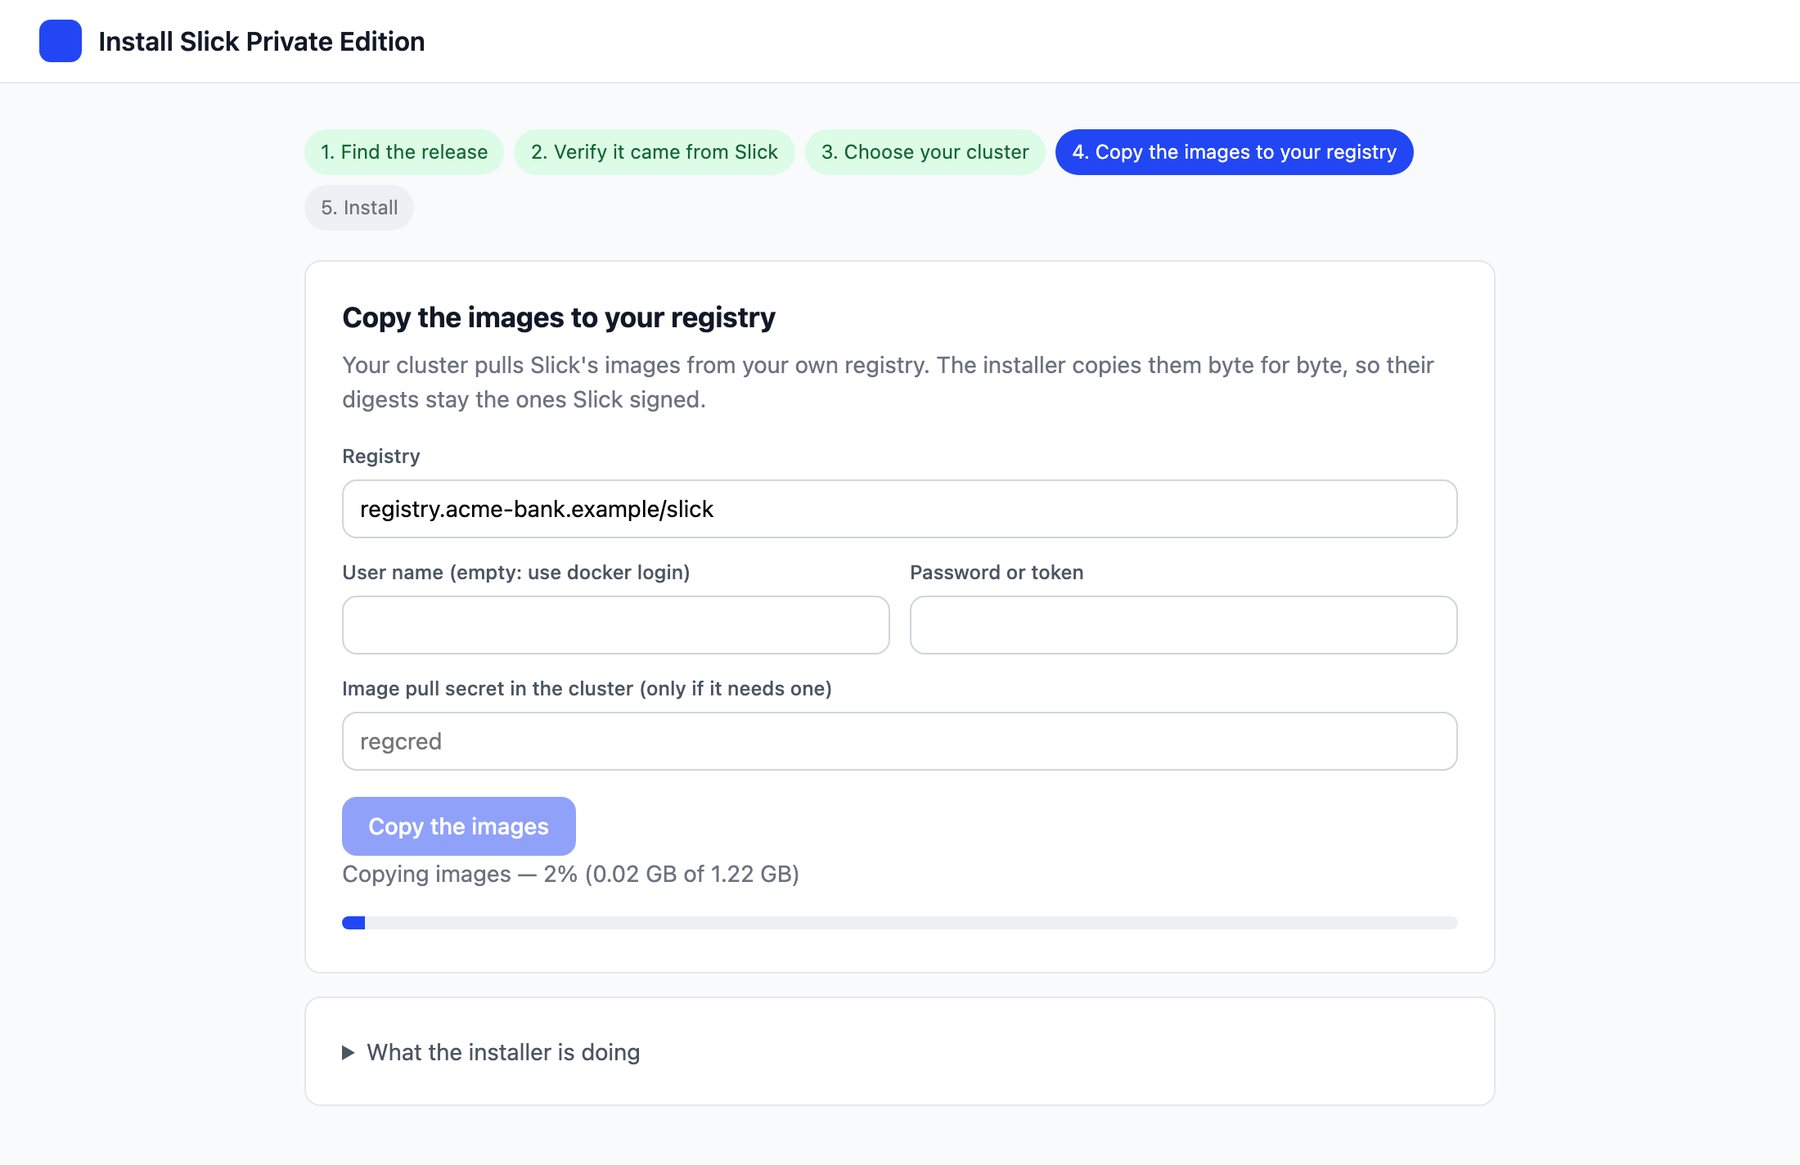
Your cluster pulls Slick's images from your own registry. The installer copies them byte for byte, so their digests stay the ones Slick signed. Leave the user name empty to use your existing docker login or the REGISTRY_USERNAME / REGISTRY_PASSWORD you exported. Name an image pull secret only if your cluster needs one.
5. Install
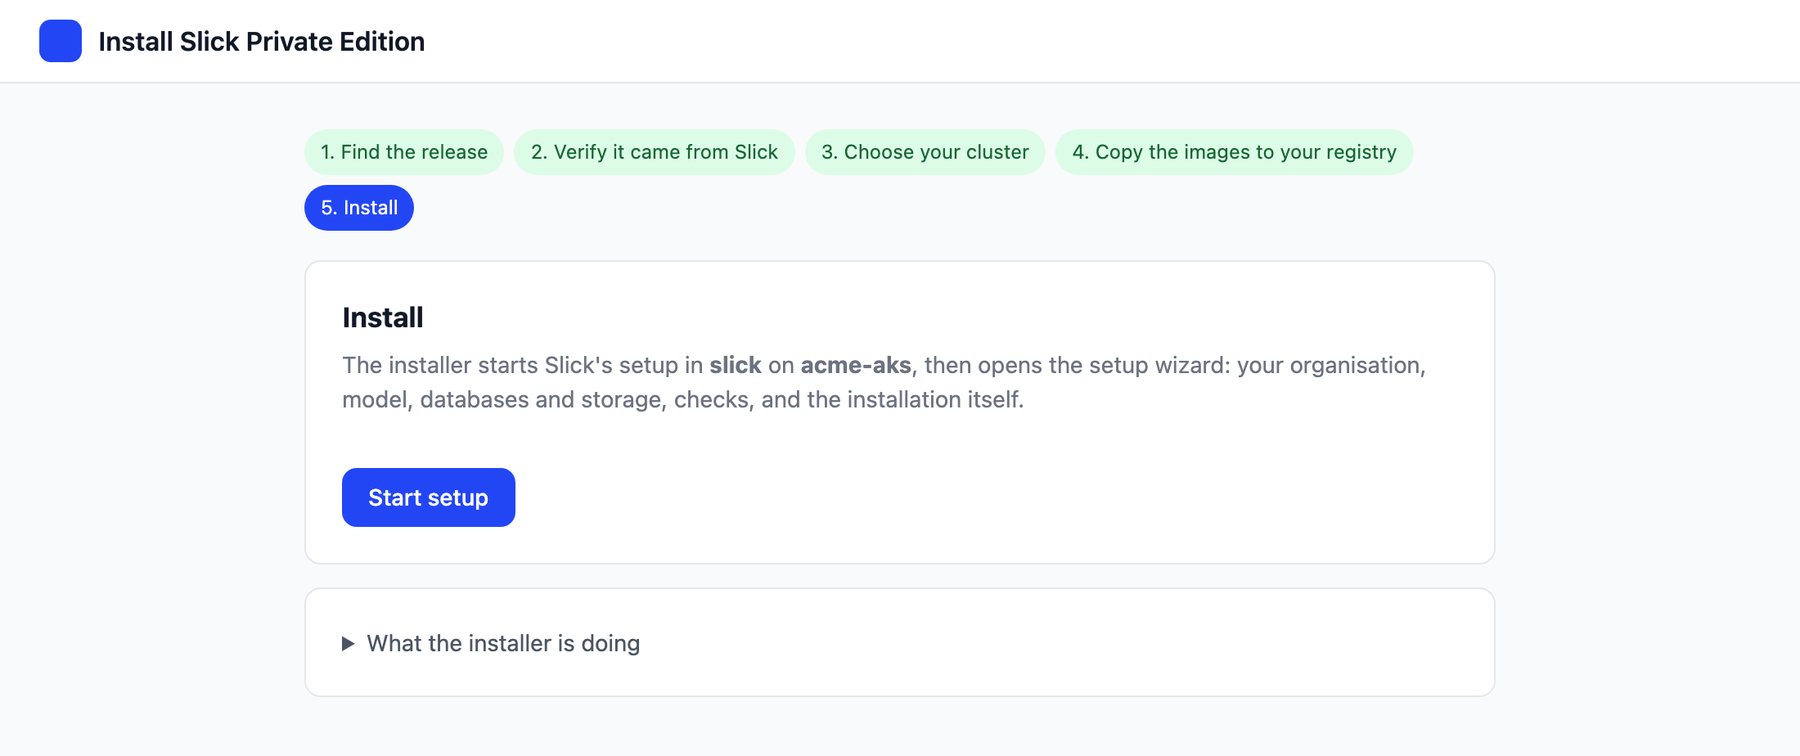
Start setup starts Slick's setup in your namespace and opens the setup wizard in a new tab, already signed in.
Terminal and unattended runs
On a server without a browser, the same steps run in the terminal:
./slick-install-linux-x64 --terminalFor automation, pass every answer up front. Registry credentials come from REGISTRY_USERNAME / REGISTRY_PASSWORD, or from docker login:
./slick-install-linux-x64 --yes \
  --bundle slick-private-2026.10.4.tar \
  --fingerprint sha256:<from Slick> \
  --context <kubectl context> --namespace slick \
  --registry registry.acme-bank.example/slick
It stops at the same point as the browser flow: setup is running in the cluster and the wizard is reachable. It prints the wizard's address and keeps the connection open until you stop it.
B · Setup wizard from kubectl
The same wizard, started by hand. You import the images with the tool inside the release, then apply the setup manifest the import writes.
- Unpack the release and import it into your registry. The importer refuses the release unless its signatures chain to the root key fingerprint, and checks that your registry stored the same digests.
tar -xf slick-private-2026.10.4.tar && cd 2026.10.4 export REGISTRY_USERNAME=… REGISTRY_PASSWORD=… node tools/infra/private/release/import-bundle.mjs . \ --root-fingerprint sha256:<from Slick> \ --registry registry.acme-bank.example/slickTo check a release without pushing anything, addOutput
verified Slick Private Edition 2026.10.4: signed by slick-rel-2026a (trust bundle seq 3), chart and 5 image(s) intact upgrades from 2026.10.0 or later (the upgrade job refuses older installations and any downgrade) pushed core registry.acme-bank.example/slick/slick-private:2026.10.4@sha256:e5b322ad0c5f… pushed portal registry.acme-bank.example/slick/slick-portal-private:2026.10.4@sha256:83bca18168e3… pushed slick-manage registry.acme-bank.example/slick/slick-manage:2026.10.4@sha256:bc39f7e6c87b… pushed slick-test registry.acme-bank.example/slick/slick-test:2026.10.4@sha256:f1b7a75d7e35… pushed slick-code registry.acme-bank.example/slick/slick-code:2026.10.4@sha256:5ff6be317027… values images.values.yaml chart chart/slick-private-2026.10.4.tgz setup setup.yaml--verify-only. If your cluster pulls with an image pull secret, add--pull-secret <name>. - Start setup in your cluster and read the setup code from its log:
kubectl create namespace slick kubectl -n slick apply -f setup.yaml kubectl -n slick logs deploy/slick-setup | grep "setup code" kubectl -n slick port-forward svc/slick-setup-portal 3000 - Open
http://localhost:3000/setupand enter the code.
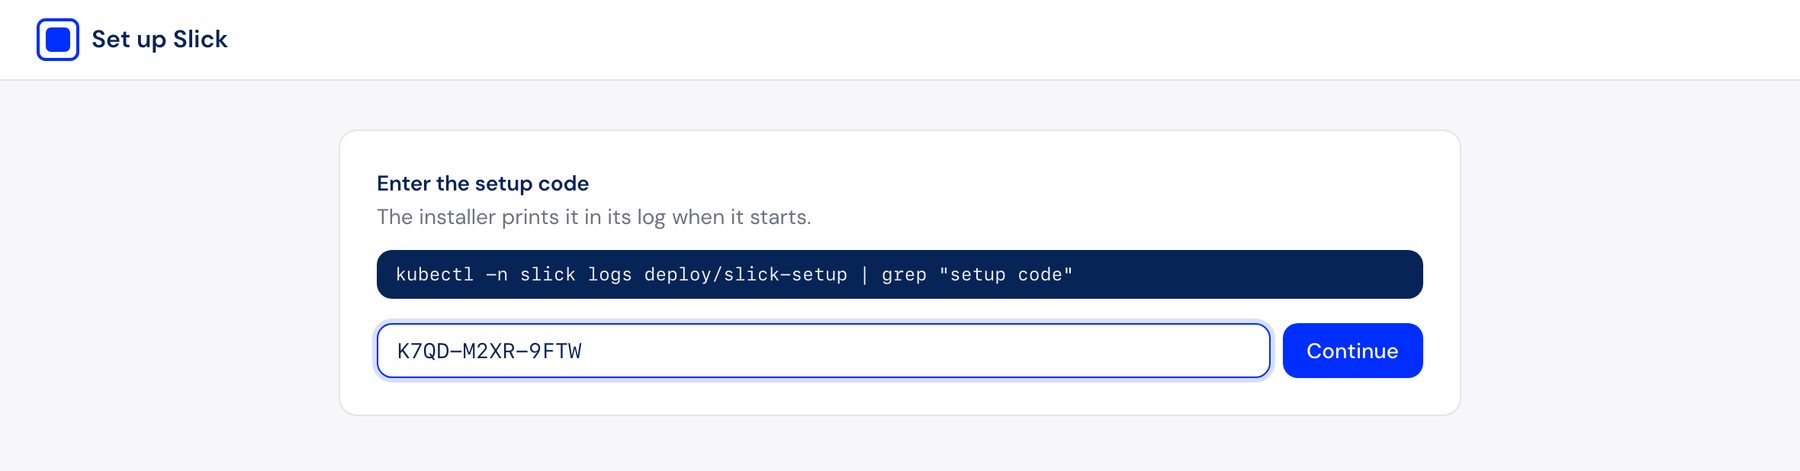
kubectl port-forward, never through a public ingress.The setup wizard
Options A and B continue here. The wizard runs inside your cluster, served by Slick's own portal. It asks for your settings, checks each service from the cluster, then installs Slick and shows every step.
Settings
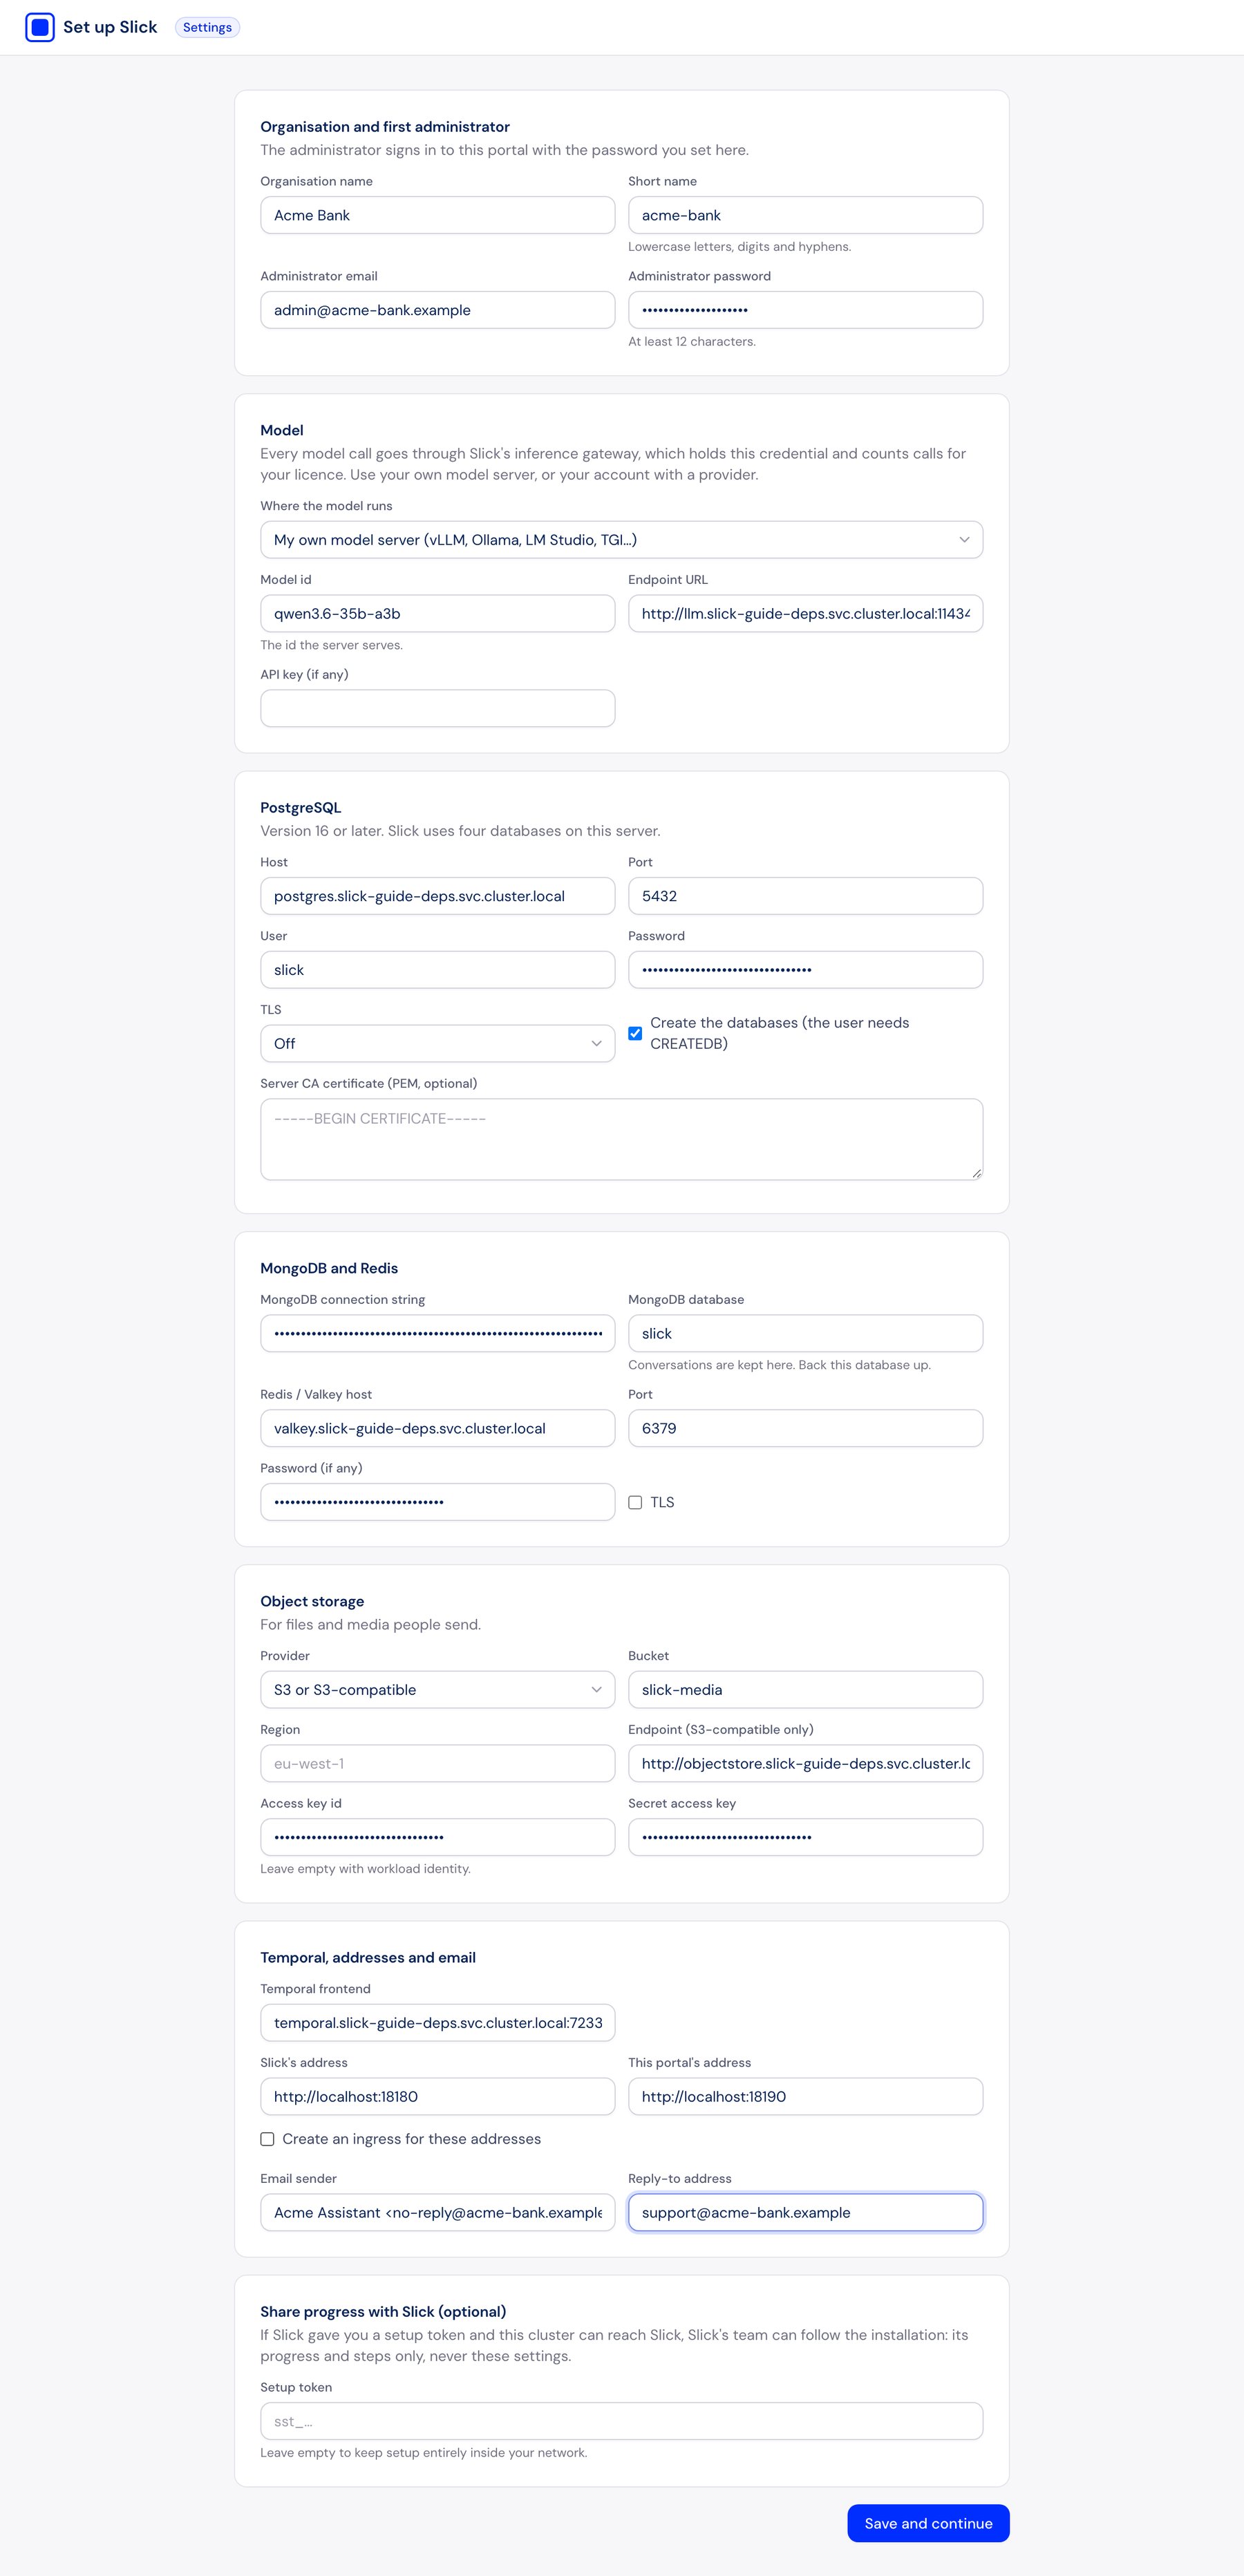
One page, in sections. Passwords and connection strings stay masked, and none of them is shown back once saved.
| Section | What to enter |
|---|---|
| Organisation | Its name, a short name (lowercase letters, digits and hyphens), and the first administrator’s email and password (12+ characters). |
| Model | Where the model runs: your own model server, or a provider. For your own server, the model id and endpoint URL. For a provider, its key, region or project, and how the gateway may reach it (an address range or your proxy). |
| PostgreSQL | Host, port, user, password, TLS mode, and whether Slick may create its four databases. |
| MongoDB, Redis | The MongoDB connection string and database; the Redis or Valkey host, port and password. |
| Object storage | S3, S3-compatible or Azure Blob, with its bucket or container. Leave the keys empty with workload identity. |
| Temporal | The frontend address, for example temporal-frontend.temporal.svc:7233. |
| Addresses | Slick's address and the portal's address, and optionally an ingress for them. |
| The sender and reply-to address for invitations. | |
| Share progress | Optional. With a setup token from Slick, Slick's team can follow the installation's steps. Leave it empty to keep setup entirely inside your network. |
Checks
Save and continue checks the settings, names any field that needs attention, and takes you to the checks.
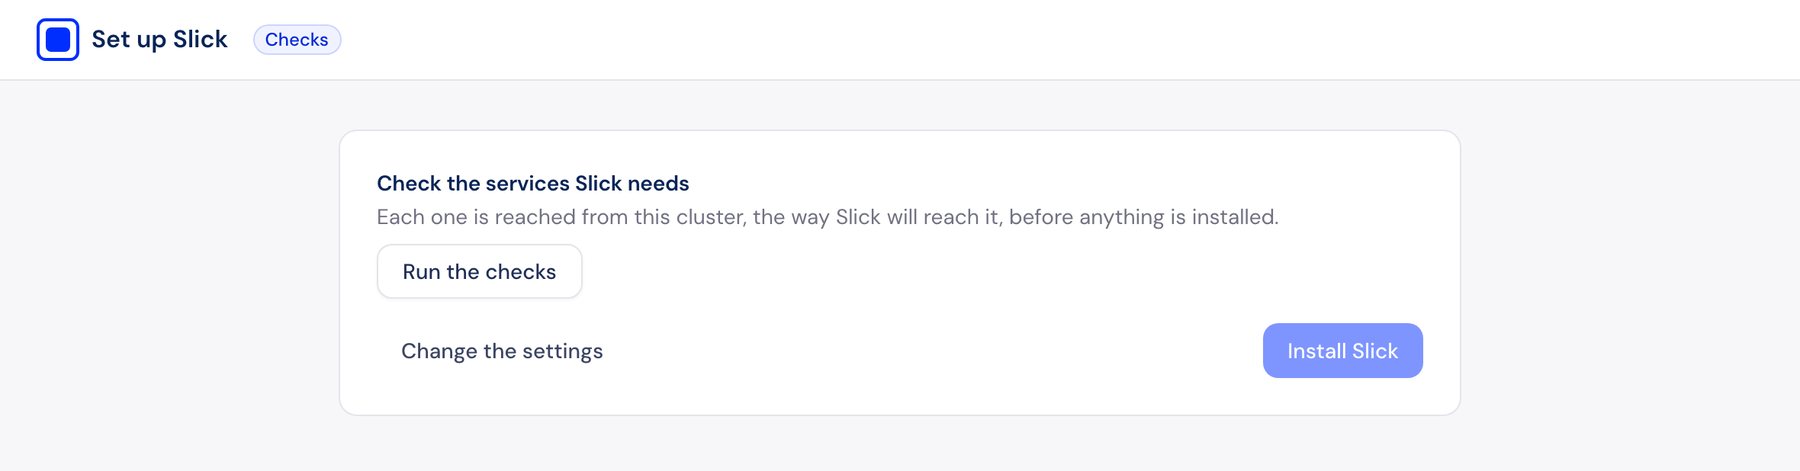
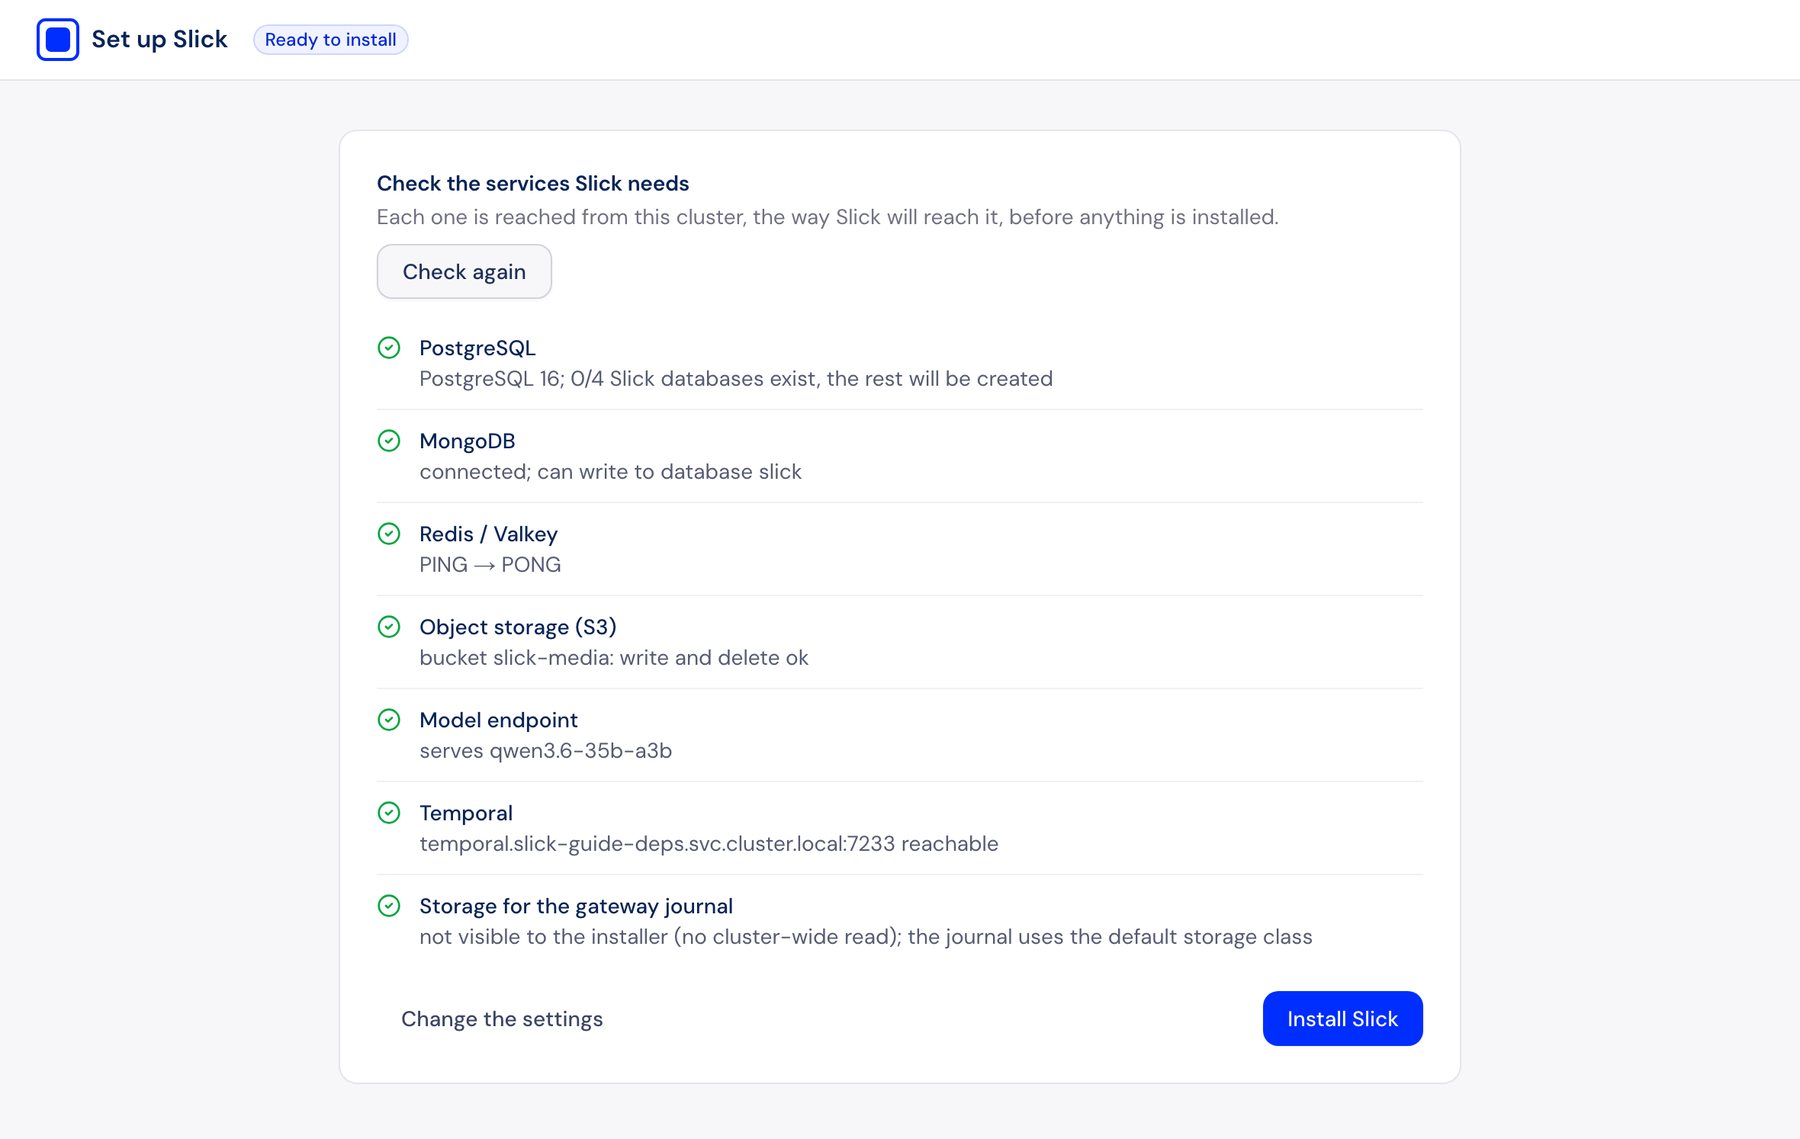
Run the checks reaches each service from inside your cluster, the way Slick will, before anything is installed. Anything wrong is named, with how to fix it. Install Slick is available only when every check passes.
Install
The wizard creates this installation's identity and secrets, checks the settings against the chart, prepares the databases, starts every component, and gives the first administrator their password. Last, it sends one message through Slick as an end-to-end check, and asks the model directly through the inference gateway.
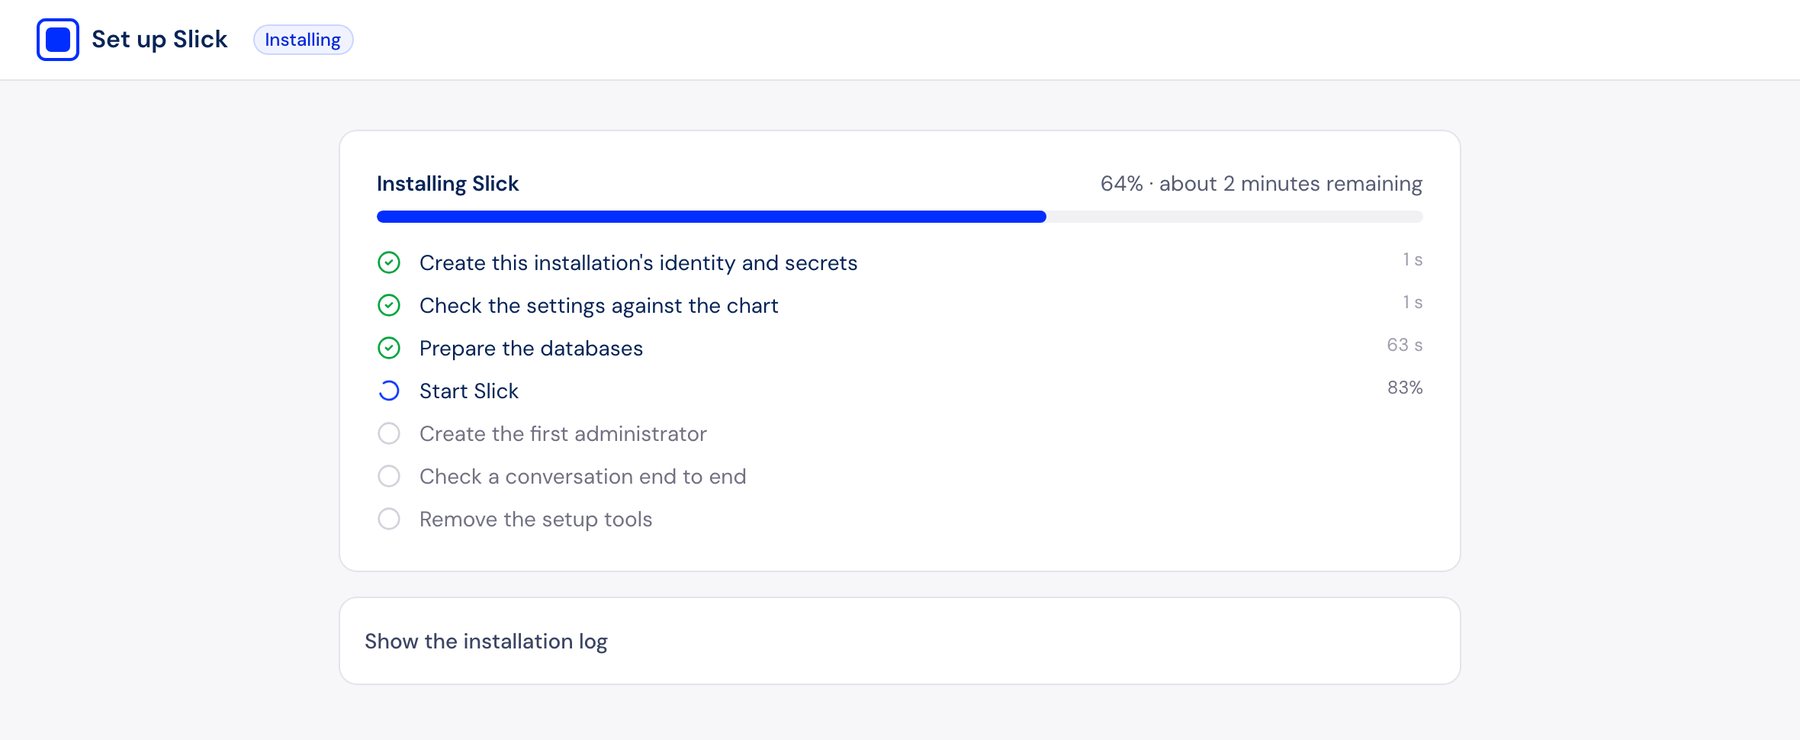
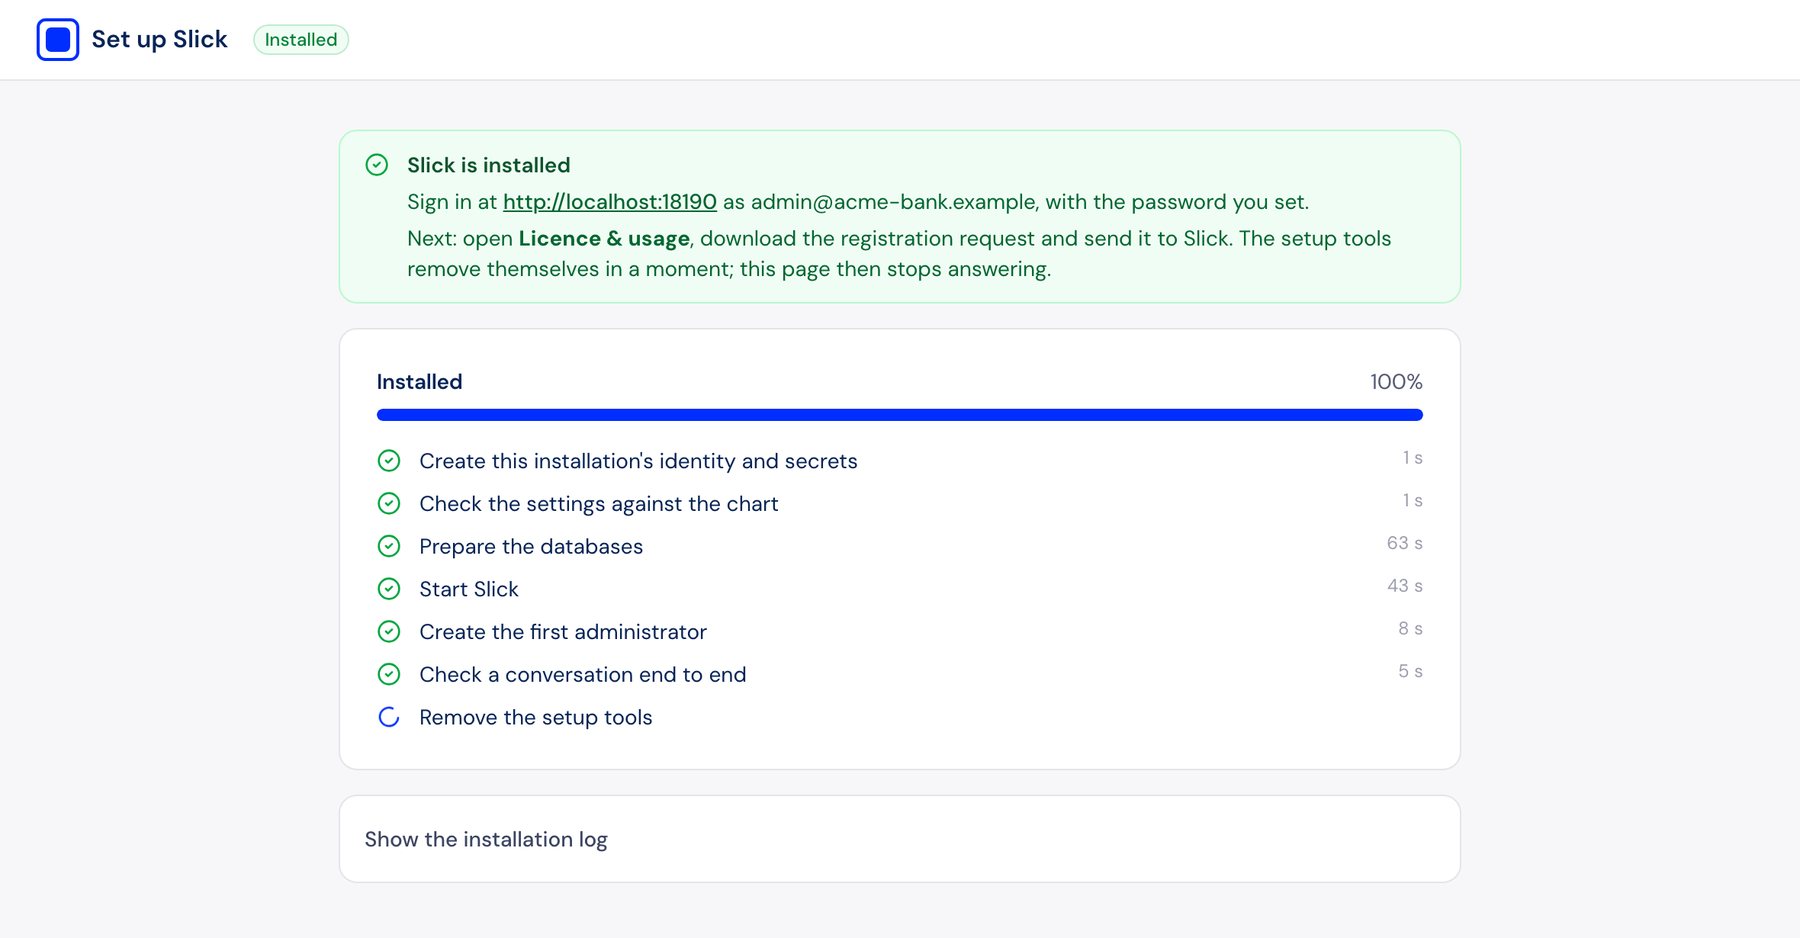
If a step fails, the wizard shows why and what to change, and Retry resumes from that step. On the installation these screens come from, the install took about two minutes once the images were in the registry.
slick. The outcome is kept in the ConfigMap slick-setup-result for support.C · Helm by hand
For GitOps and change-managed environments. You write the Secret and the values file yourself. The complete reference is INSTALL.md in the release, and helm show values lists every chart setting with comments.
- Import the release into your registry, as in option B, step 1. It writes
images.values.yaml, which pins every image by digest. - Create this installation's identities, once. Keep them for the life of the installation: your licence is bound to the installation identity.If your Secret comes from a secret manager, run the scripts without
kubectl create namespace slick kubectl config set-context --current --namespace slick kubectl create secret generic slick-secrets node tools/infra/private/scripts/installation-identity.mjs --kubectl slick-secrets | sh node tools/infra/private/scripts/mcp-agent-keys.mjs --kubectl slick-secrets | sh--kubectl; they print the values to store there. - Fill in the Secret
slick-secrets: the PostgreSQL, MongoDB and Redis credentials, storage keys (unless you use workload identity), the model's key if it has one, and random values (32+ characters, for exampleopenssl rand -hex 32) for the internal tokens.INSTALL.mdstep 4 lists every key.Set USER_SECRETS_ENCRYPTION_KEY once and keep it. It encrypts stored credentials such as MFA secrets and channel tokens. Changing it makes everything it encrypted unreadable. - Write your values file. At minimum:The chart refuses to render when a required setting is missing, or when any endpoint points at a Slick-hosted address.
organisation: { slug: acme-bank, name: Acme Bank, ownerEmail: [email protected] } model: { id: <model id from Slick>, baseURL: "http://vllm.models.svc:8000/v1" } postgres: { host: pg.db.internal, user: slick, caConfigMap: db-ca } redis: { host: redis.cache.internal } objectStorage: { provider: s3, bucket: slick-media, region: eu-west-1 } temporal: { address: "temporal-frontend.temporal.svc:7233" } existingSecret: slick-secrets urls: { api: "https://chat-api.acme-bank.example", portal: "https://chat-admin.acme-bank.example" } email: { from: "Acme Assistant <[email protected]>", replyTo: [email protected] } ingress: { enabled: true, className: nginx, host: chat-api.acme-bank.example, tls: [{ secretName: slick-tls, hosts: [chat-api.acme-bank.example, chat-admin.acme-bank.example] }] } networkPolicy: extraEgress: [{ cidr: 10.20.0.0/16, ports: [5432, 6379, 27017] }] # anything outside the cluster portal: { enabled: true } - Install. A job runs first: it creates or migrates the databases, creates the Temporal namespace, and sets up your organisation, its main agent and its owner. If it fails, nothing else changes.
helm upgrade --install slick chart/slick-private-2026.10.4.tgz -n slick \ -f my-values.yaml -f images.values.yaml - Give the first administrator a password (12+ characters, read from a file, never typed on the command line), then sign in at your portal address:
kubectl -n slick exec -i deploy/slick-server -- \
  sh -c 'NODE_OPTIONS= node infra/private/schema/first-admin.mjs' < first-admin-password.txt
After installing
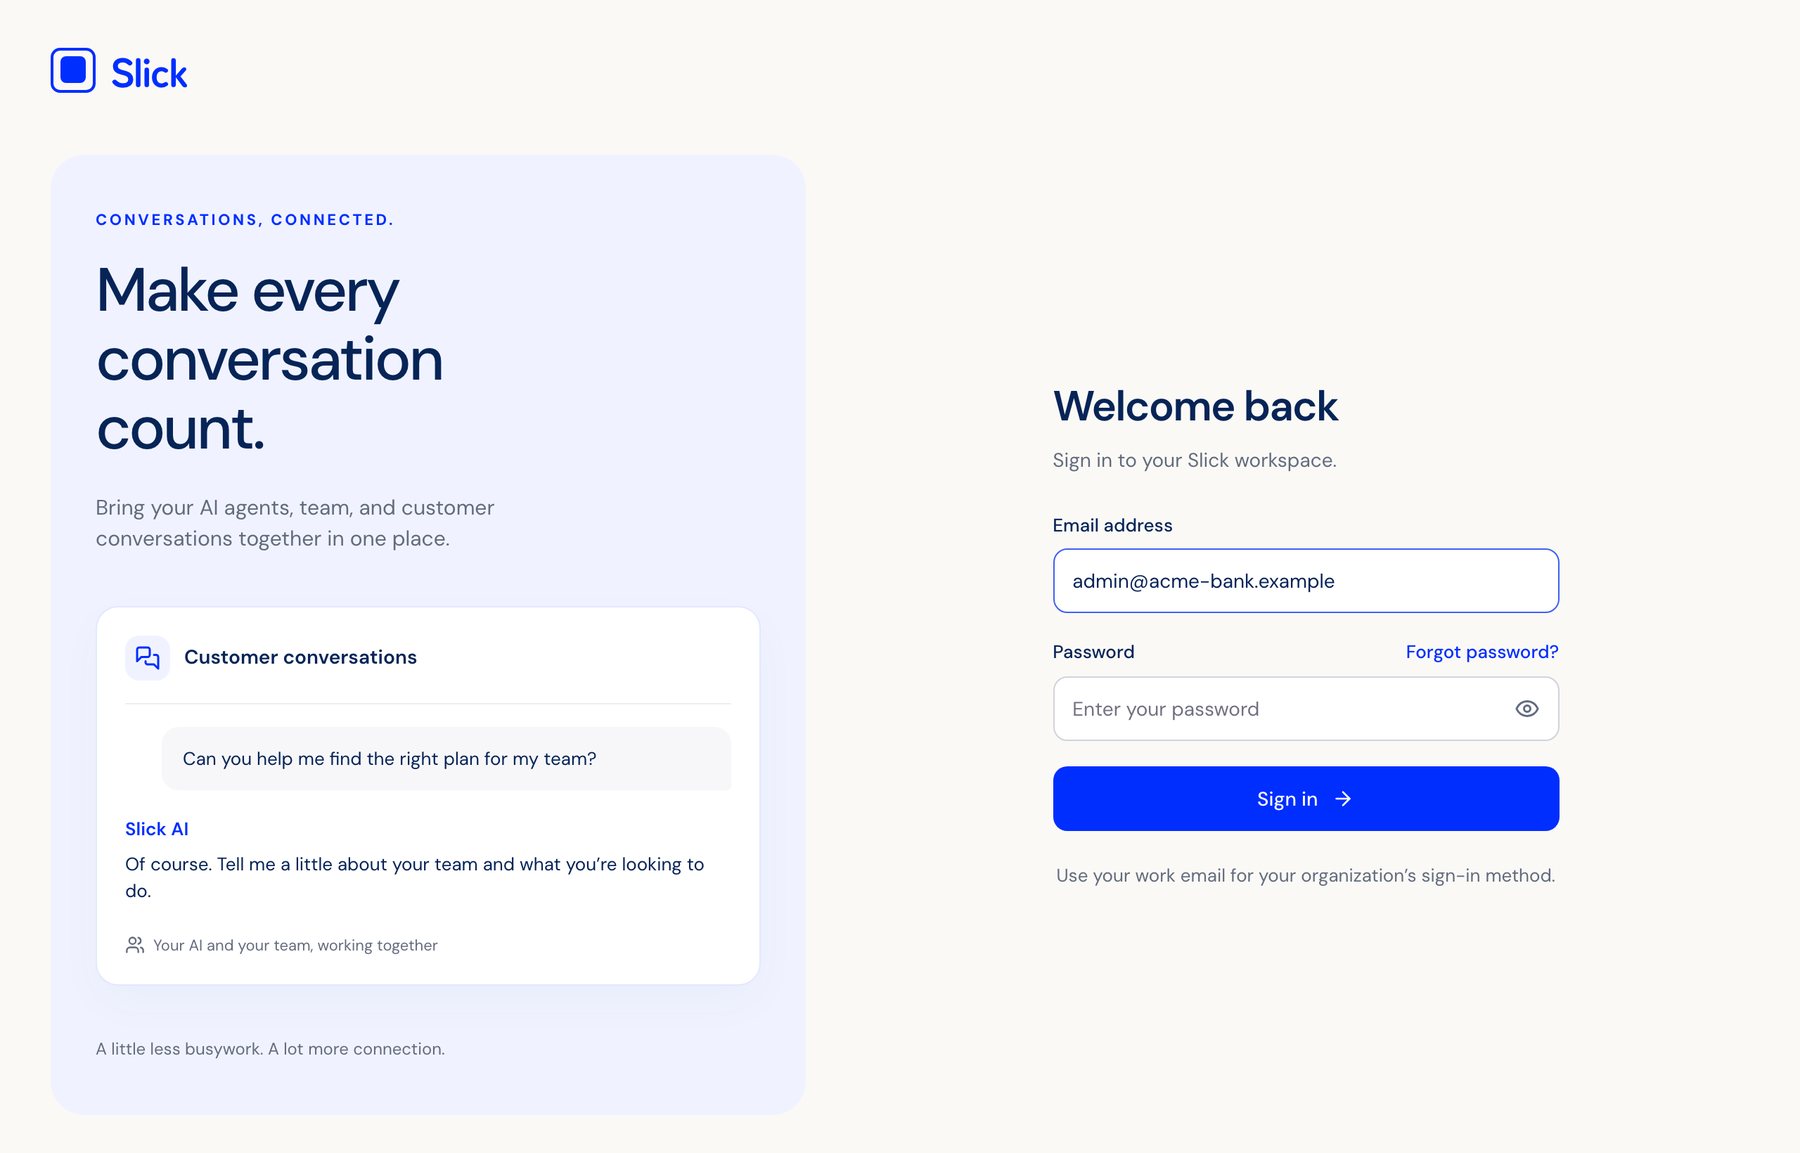
Sign in to the portal as the first administrator with the email and password from setup.
Licence
The licence is always enforced. Until you import one, the portal, administration and licence import work, but agents can't be created or reply to your customers.
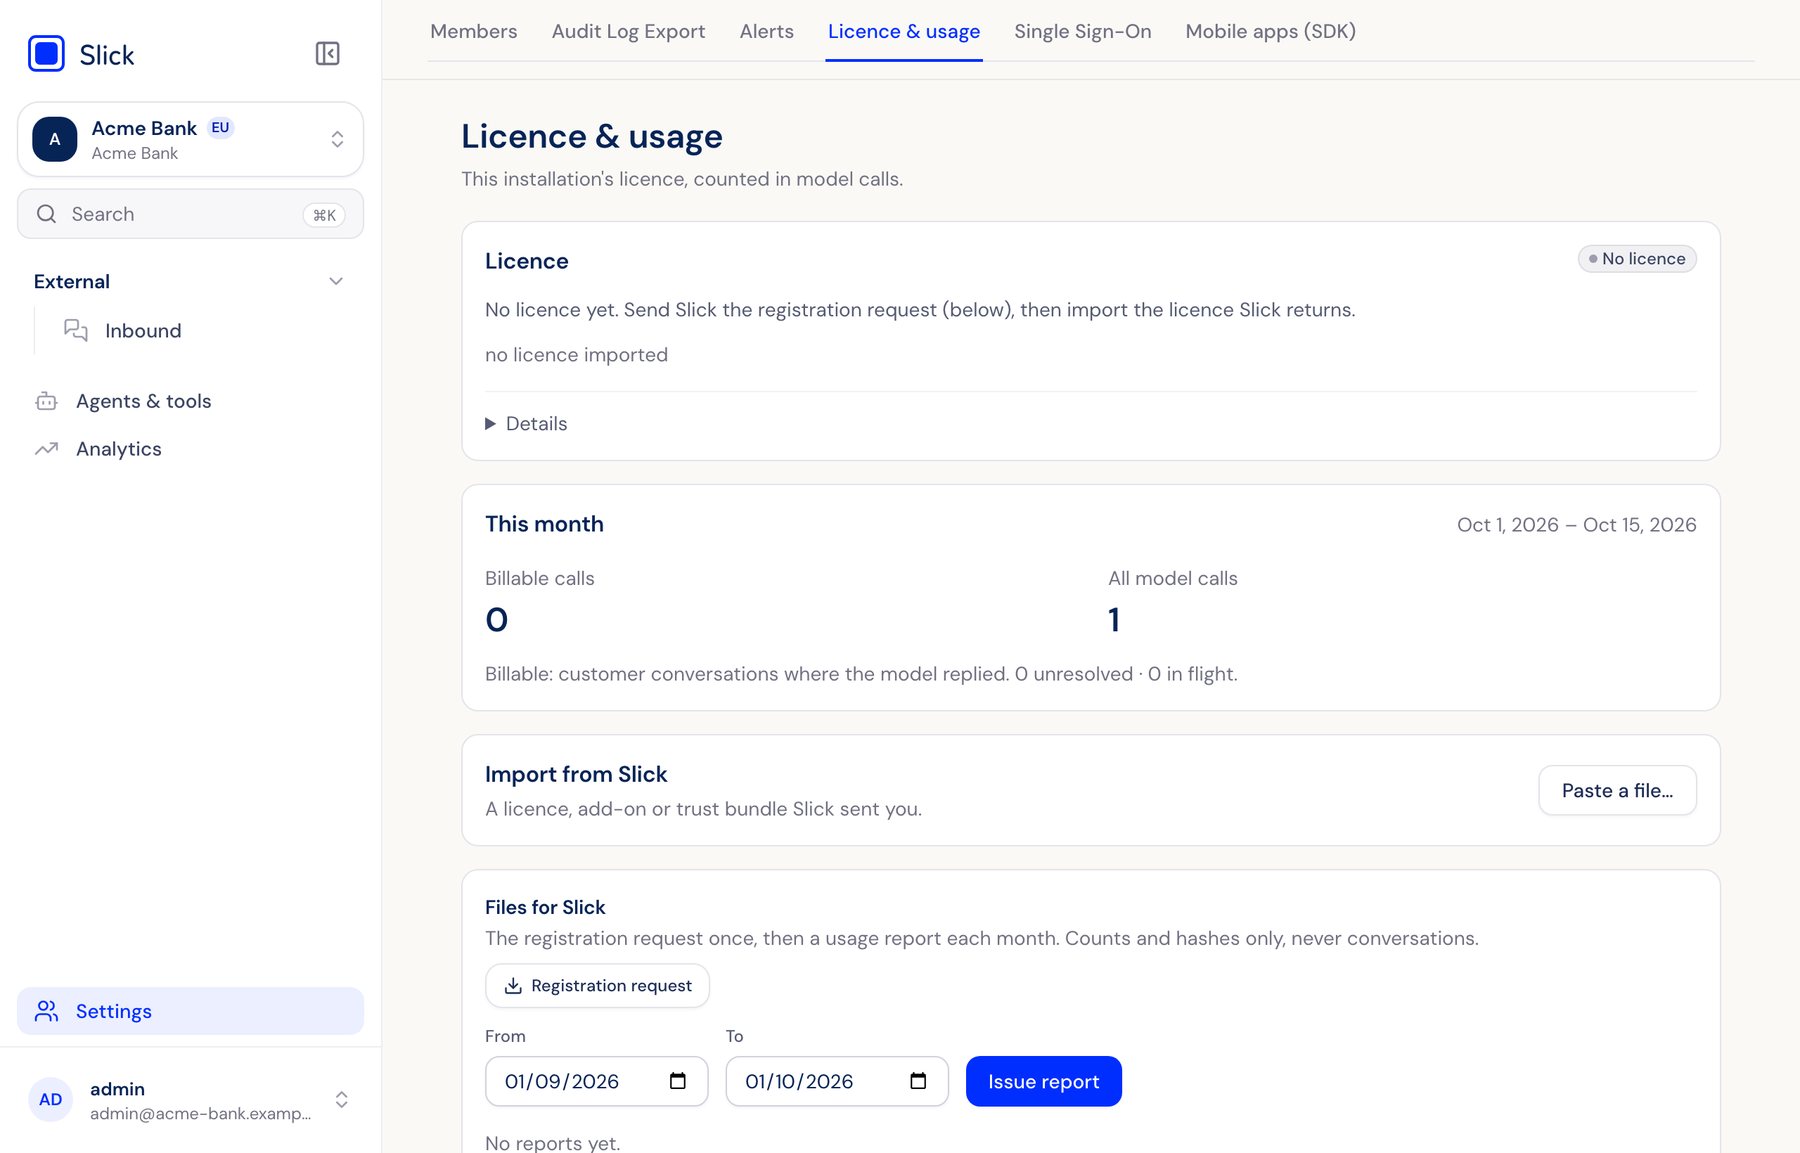
- Open Licence & usage and download the registration request. It is signed by this installation and contains no customer data.
- Send it to Slick. Slick returns a licence bound to this installation. To evaluate first, ask for a free trial: it is a licence like any other.
- Import the licence on the same page.
Check the installation
https://<api host>/healthzanswers 200.- A pod cannot reach the internet:
kubectl -n slick exec deploy/slick-server -- curl -m 5 https://example.comfails. - Once the licence is imported, a web chat message in the portal is answered, and Licence & usage counts it.
Upgrades
Each release comes as a new download. Every installation upgrades with helm upgrade, however it was installed.
- Verify and import the new release into the same registry (option B, step 1), and read its release notes.
- Back up (below), and rehearse in a non-production installation.
- Upgrade with the new chart and
images.values.yaml. Installed with the setup wizard? It kept your settings in the Helm release, so save them first:helm get values slick -n slick -o yaml > my-values.yaml helm upgrade slick chart/slick-private-2026.10.4.tgz -n slick \ -f my-values.yaml -f images.values.yamlimages.values.yamlcomes last, so it replaces the previous release's images. Don't use--reuse-values: it carries the previous chart's defaults over and hides the new release's. - Check the upgrade job with
kubectl -n slick logs job/slick-schema. It records the upgrade and migrates the databases before the new release starts; its last line names the release:[migrate] all databases up to date [release-guard] 2026.10.4 succeeded
Backup and restore
Back up on a schedule and before every upgrade.
| What | How |
|---|---|
| Four PostgreSQL databases | pg_dump -Fc, one file per database (names in postgres.databases) |
| MongoDB | mongodump --db <name> --archive, using the database in mongodb.database (default slick) |
| Object storage | Your storage service's own versioning or replication |
| Temporal | Temporal's own backup procedure |
| The Secret slick-secrets | Your secret manager. Keep PRIVATE_INSTALLATION_ID and PRIVATE_INSTALLATION_KEY_PEM safe: the licence is bound to them. |
To restore: scale slick-server, slick-worker and slick-gateway to 0, recreate and pg_restore each database and mongorestore --archive the MongoDB archive, then scale them back. Slick runs this procedure end to end for every release before it ships.
When something fails
| What you see | What to do |
|---|---|
| The release won't verify | Check the fingerprint against the one Slick gave you by phone or contract, and the file’s SHA-256 against your download page. Download it again if the checksum differs. |
| The image copy stops | Run the same step or command again. Images and layers already in your registry are skipped. |
| A check fails in the wizard | It names the service and the fix. A service outside the cluster usually needs an address range in networkPolicy.extraEgress, or for a provider model, the gateway’s address range or proxy. |
| An install step fails | The wizard shows the reason. Change what it names, then Retry, which resumes from that step. |
| Windows SmartScreen | The installer is signed by Slick AI Technologies, Inc. Choose More info, then Run anyway. |
| Agents don't reply | Check Licence & usage: without an active licence, customers get the fixed “can’t reply automatically” message. |
Asking Slick for help
Send a support bundle. It holds what Slick needs to diagnose the installation, passes everything through a redactor, and never includes the Secret, database contents, conversations or prompts. It needs kubectl and perl (on Windows, run it in WSL or Git Bash):
bash tools/infra/private/scripts/support-bundle.sh -n slickLogs can contain what your customers typed, so they are left out unless you add --with-logs; read them before you send. Installed with the setup wizard? Also send the setup outcome: kubectl -n slick get configmap slick-setup-result -o yaml.
Planning an installation?
Your Slick contact can walk through the prerequisites with your platform team before you start.
Talk to usSlick Private Edition 2026.10.4. Screens are from a real installation of this release; Acme Bank and registry.acme-bank.example are examples. The complete reference is INSTALL.md inside the release.